Showing posts with label Home Decorating. Show all posts

September 24, 2020

DIY Home Decor: Chevron Pattern Stamped Curtains

Hi creatives!

A DIY Home Decor craft project today, chevron pattern stamped curtains, that has literally taken me forever to get up here on the blog!


I had some old random curtains that I thought needed a bit of work. I sewed two different curtain sets I had here together because the window I have is large. 

To make these stamped curtains you will need:

- plain curtains 
- piece of wood plank off cut for the stamp back (mine measures 14 x 33cm or 5.5 x 13")
- craft foam 
- white block printing ink 
- fabric paint additive (optional)
- block printing brayer (roller)
- piece of glass
- craft glue 
- scrap fabric, scrap paper, spatula to scoop paint, rags for clean up, glue stick & sticky tape 

You'll need a large flat surface to print on- the floor is good or a table but make sure it's protected with drop sheets. My floorboards are textured so we found a long, wide piece of laminate wood in the garage that I put under the section I was printing on.

You may want to add a craft fabric paint additive to your paint, which will turn your creation washable. You will need to heat set this with an iron according to manufacturers instructions. I didn't do this as I didn't have enough left and was too lazy to go buy some and even lazier when it comes to washing curtains, so these will probably last me a long time! ;)

I started by doing a quick drawing of the pattern I wanted, and then cut out strips of craft foam to glue to my wooden block. I drew a line down the middle of the wood so I could make sure my foam pieces were centred, and I used a little paper template to make sure all the angles were the same, and glued them down with craft glue. (My foam pieces measured approx 85 x 8mm or 3 3/8 x 5/16")


*After testing the print, I added a second layer of foam strips to the first one to be more spongey, it enabled me to get a better more uniform print than just one later of foam.*


Once I had my stamp made (and let dry overnight), I made a test by stamping on paper, but before lifting trace around the stamp and cut the print out. It was then glued to the top of the wood (just with a glue stick) so that when I used the stamp I could see exactly where the print was going to be. I covered it with tape for extra protection, as the stamp needed to be washed out after each use and I did this project in multiple stages.


Using block printing ink (add your fabric additive here if using) and a brayer roll out an even layer of ink, then use the brayer to roll the ink on your stamp. Do some test printing on scrap fabric until you work out the amount of ink you need and pressure to get a good print. I literally stood on the back of my stamp every time I printed, as that gave me a stronger print.


Make sure your surface is protected with drop sheets, and that also your work surface is smooth. I used a long piece of laminate wood that I had in the garage as my floor is textured and my table tops are all wonky (natural wood!). 

Use some scrap paper to cover places like the curtain tabs at the top, that you do not want printed, then you can get your pattern all the way to the top. (Not like in this below photo! I fixed that up later on!)


I went all the way down one side of one curtain with the pattern, then I started the next line by placing the stamp down and then measuring with measuring tape where the edge of the stamp was, then marked with masking tape all the way down the length of the curtain so that my pattern didn't go off track. I did this for each new line of stamping.


I then continued on in stages, letting some dry so I could fold the curtain up and stand on the dry parts, and then continued. My curtains were quite wide so it may not be as big a job for you as it was for me!


Done! DIY home decor in the form of stamped chevron patterned curtains. I hope you liked this tutorial!


Jules :)

September 11, 2019

DIY Craft: Faux Weaving


Hello Creatives!

I have a fun DIY craft today: faux weaving. 

I'm sorry I have not been around much! *cry* In all honestly I think I was suffering the winter blues and have had a long stretch with no inspiration. It happens to us all!

But something colourful is sure to cheer us up ;) And the sunshine that is out today. Sunshine helps!

This faux weaving was made by sewing wool, threads and trims onto a fabric panel. A look around your craft or fabric store will no doubt find you some interesting options & trims for creating your own faux weaving.

This wasn't a super quick project, but I'm liking the way it turned out and will feel quite happy with this hanging on my wall somewhere. You could squeeze it into a lazy weekend.

You will need:

- fabric for backing 19' wide x 20" high (48 x 51cm)
- various wools/ yarns/ threads/ trimmings/ pom poms etc
- Yarn needle with sharp end
- wooden skewer
- dowel rod (I used a piece of bamboo)


Sew hems 1/2" (1.5cm) down the sides of the fabric. Add a hem to the top making sure you leave enough space for the dowel to go through. I didn't hem the bottom as that was the selvage and will not fray.

Start decorating! Below here you can see I've added long running stitches and then loosely woven thick wool through them. 


Thick roving looks amazing. I stitched it down with vertical stitches as I went across. Once I did a row of this, I went back and did another row, mirroring the way I'd stitched the previous row.


I sewed down some random pom poms from my stash, and then made smaller little tufts by stitching loops in the fabric and then cutting them with scissors. A row of these would look good!


I also included lots of running stitches, sewing down multiple strands of wool, and sewing down thick wool but leaving little loops protruding randomly (above photo).


Lengths of wool looped at the top were added along bottom of the fabric. I found if I only looped over stitches it didn't look as neat, so I used a skewer to pull the loops tight and then sewed them to the bottom, then pulling the skewer out. I trimmed all this bottom hanging wool to a triangle shape.

Overall I'm pretty happy with the result! A fun project if a real weaving seems a bit intimidating for you!


July 08, 2019

Studio Wall Mural

I have a new wall mural in my new studio!

We recently did some room shuffling in our house, and I moved studios. The room is slightly bigger with more storage than my last studio, but with all my stuff in there it looks small again! Oh well. I have plans that when my kids are all grown up and moved out I will take over so many rooms. 


Imagine that! A designated room for each area of my work.. a sewing room, a clay room, a computer room, a painting room. One can dream, ha!

I'll share some finished photos of the whole studio soon, but for now I'm showing this one corner. (I really need to clean the rest of the studio and I'd like to buy an outdoor rug to save the floor from a bit of paint.)

Here are some of the progress shots of the wall mural in progress:


I used a mix of student grade acrylics and house paint sample pots from the local hardware store. 


And some more photos of the finished wall mural:


The pre exisiting-shelves are handy to keep artworks-in-progress on, little creations and collectables.


I hope you enjoyed looking at this part of my new studio! I had a lot of fun painting this new mural.

Jules :)

November 07, 2018

Home Decorating For Kids: My Daughter's Jungle Room Makeover!

Hello, Creatives!

I'm sharing with you my latest creative home decorating project, my youngest daughter's new African jungle safari themed bedroom, complete with a new mural!


The mural requests were: jungle themed and needs cheetahs and a python in it.

The big paper mache tree was made a while ago in my girls' previous bedroom, but as they're growing older I felt they needed their own space and so a new bedroom was made free, and the tree found it's new location in this room. I have received many questions about the construction of the tree in the past so I will elaborate on the how-tos in a future blog post.

I'd always dreamed of doing up my own kids rooms before we even had kids. The problem is they're so quickly growing and won't be kids for much longer, so I thought, it's now or never!

My youngest used to have a pretty white iron bed, which didn't really fit into the new bedroom's theme. Husband wasn't keen to buy a new bed considering she had one already that was working perfectly fine. Then by a strange coincidence, a friend showed me a photo of the bed below at school one day saying she was getting rid of it, and would I like it, FOR FREE. She also threw in the green wool rug AND the 10 metres of white fabric. Friends that declutter are the best! Thanks, Steph!


I tea-stained the fabric by soaking it in the washing machine with all of the tea bags from my canister brewed in boiling water and then tipped into the mix. After 24 hours of soaking, I put on a spin cycle. I didn't bother rinsing as I wanted to keep as much of the staining in as I could. 

I then sewed the fabric into a tent to fit over the bed. That sounds so simple, but it was blood, sweat, and tears! I remembered whilst sewing why I tried to con my Mum into making it for me, with no luck. (She is such a good sewer though, it would have been a piece of cake for her.)

Someone feels right at home in her new safari tent bed. My daughter likes it too! :)

The gorgeous snow leopard art print on the wall is by the super talented Sofia Moore. I absolutely love how it's a snow leopard, but it has prettiness about the illustration too. Because even though my little girl is into leopards and pythons (bats, lizards, and spooky movies) she is also very much into pink, sparkles, and pretty too! When my daughter saw this print, she made cutesy noises and wanted to cuddle the leopard :)


The tree needed some paper mache repairs to it and a bit of fresh paint. It's big enough for a kid to sit and stand in, and the little 'windows' have ledges so that toys can sit in them. The kids can also peer out of them from the inside, too. 


Oh, hello there little tiger!


The room is now perfect for my girl's ever-growing cat soft toy collection :)


I didn't want to cover the whole wall with the mural, as I wanted some space for furniture underneath.


A handmade mini tree ornament we found at the local Arts Market doubles as a jewellery holder.


I found both the curtains and the vines on eBay for a steal. Other than buying a tonne of paint to cover the previously dark walls (about 5 freaking coats!), this project was pretty budget friendly.

I recorded the whole painting of the mural in time lapse! Which you can see on my very first youtube video:


The curtains were such a happy find. They are just cheap ones but they really compliment the room and fit the theme.


Detail of a corner with some personalised touches below. My girl's treasured Steve Irwin shirt from the year she raised money for wildlife as a Wildlife Warrior, a little shadow box for collections (also from Steph), and a customised anime picture from a good friend.

I also painted ombre walls in the colour of a pale African sky. (Which would have matched my original African plains theme, but whilst we were buying paint youngest informed me it needs to be jungle themed. Oh well, go with the flow!)


I had such fun decorating this room!

I have a lot of work ahead of me completing new bedroom #2 for my eldest daughter, my new studio (as we're doing a room swap), and the main bedroom that the husband and I have just moved into. Oh my! Almost makes me want to sit in bed and binge watch Netflix it's so overwhelming!

The old suitcase used as a side table belonged to my Grandpa. A sentimental touch :)

I hope you have enjoyed reading about our new African-jungle-safari themed kids room as much as I enjoyed making it. 

If you have any questions, please feel free to post them below.

Cheers,

Jules :)

May 22, 2018

Crafting A Patterned Home - Book by Kristin Nicholas

I have been following Kristin Nicholas on her blog Getting Stitched on The Farm for a while now, and what I love about her is that she seems genuinely motivated out of the pure love of creating, to decorate her home and make things. She doesn't follow trends, she just has a love for pattern and colour that transcends the latest fashions. It's a true love affair, not just a fling!

photo by Rikki Snyder

This post contains affiliate links (see bottom of post for explanation).

So when I found out she had a new book out, Crafting A Patterned Home, published by Roost Books, I didn't hesitate, I didn't even read about it, I just jumped online and bought it!


I am, like Kristin, intoxicated by pattern and colour and love home decorating. Sometimes I walk into a minimalist space and find some peace and a breath of fresh air, but after a while, I grow bored. Pattern and colour excite me. So clearly I feel like I have lots in common with Kristin.

She has covered the walls in her home with hand-painted patterns, and objects such as lampshades and furniture are not safe... there's even a bath! In this book, she shares how she has done it.

Kristin talks about her previous book Crafting A Colorful Home in this video below, but you can get a sneak peek into her colourful life.


So even though I can appreciate a nice calm neutral home, when I saw Kristin's via this Houzz video I sat there absolutely enthralled. I just would love to sit in her loungeroom with a cuppa and cake and absorb all that pattern into my soul.

Kristin also includes some words of encouragement for the novice or the unsure (scared?) on how to get started.


She gives in-depth advice on how she creates her rooms. One of my favourite snippets of advice she gives is don't make your rooms too "matchy-matchy". I've always agreed with that line of thought; less matchy-matchy makes for a more personalised, interesting home. If all of your furniture is the same design, your rooms might end up looking too much like a furniture display store.

There's a lot of advice on colour, how to think about and design a room, and techniques and tools. There are projects for each space of the house, kitchen & dining, living room & library, bathroom and bedroom, and then outdoor spaces: pottery studio and garden shed, and in the orchard and under the pergola. And of course, if you don't have a pottery studio or pergola, you could make projects for your potting shed or outdoor deck for example.

Such as the one in the image below. I really want to do this with the chook pen window!


The book is bursting with colour, and as a creative person myself, I find it very motivating and I'm eager to try some of the projects in the book.

Thank you Kristin for a lovely book! It's going to slide out of my bookshelf and appear on my coffee table frequently!

Kristin's new book can be found here: Crafting A Patterned Home

Jules :)


*Affiliate Information: Affiliate links help me earn small commissions on products (at no extra cost to you), which helps support my love of blogging and sharing creative things. I only ever recommend or link to products that I'm genuinely into or would use.


August 09, 2017

Home Decorating Book Review: The New Bohemians

I love home decorating books! I'm chatting "The New Bohemians: Cool & Collected Homes" today here on my creative blog.

This post contains affiliate links (see bottom of post for explanation).


Justine Blakeney has divided this home decorating book into different themes of boho. The modern bohemian, the folksy bohemian, the romantic, the earthy, the nomadic... and the maximal bohemian. Each section showcases various houses along with snippets of the lives of the people that reside within them.


The book explains the bohemian decorating style as it is seen today, which aligns with a shun-the-rules, creative, and free spirited state of mind. Best of all, it's an affordable way of decorating. I'm so glad I really love the boho home decorating style- can you imagine the damage on the credit card if I was into designer furniture!?


Bohemian decorating is about mismatching, displaying your collections, celebrating the sentimental and being intuitive rather than following rules such as "your rug needs to extend past the edge of your sofa by 'x' centimetres" kind of ideas that would stop people in their tracks with decorating because they feel like they don't know what they're doing.

This is one of those books that helps give you the confidence to shun the rules and just make spaces you totally love.

It was fun to look through the book and choose which bohemian style was for me. It was Maximalist, hands down! In the book it states that the maximalist boho "includes a whole lot of everything" and "decorates wild". Uh huh.

So much yes. What a gorgeous outdoor area...

I love how within the boho style Justina Blakeney has whittled the boho decorating style down and categorised each section. Each different category could so very much be it's own separate spin off book. I have a good friend who I would order The Earthy Bohemian for, and I'll back order The Maximalist Bohemian, thank you!


The book includes practical tips and hints to achieve certain looks, as well as some DIY projects too. There is an "adopt an idea" section, where she has zoned in on a detail of home decor and explains how to recreate the effect in your own home. The DIY projects go into more detail with step by step instructions.


And a boho home ain't a boho home without plants so The New Bohemians includes a handy guide  for the best indoor plants to use & their care. (My tip: Want to decorate boho? First fill your house with cushions and plants and you're almost there!)

Best of all The New Bohemians is full of lots of juicy pictures to gain inspiration from.

Overall I really enjoyed The New Bohemians. I think it's a fabulous coffee table book chock full of home decorating eye candy for the free spirited, the wanderers and the dreamers...

Find The New Bohemians on Amazon here.

Jules :)

*Affiliate Information: Affliliate links help me earn small commissions on products (at no extra cost to you), which helps support my love of blogging and sharing creative things. I only ever recommend or link to products that I'm genuinely into.


July 18, 2017

Garden Art: Decorating Plant Pots

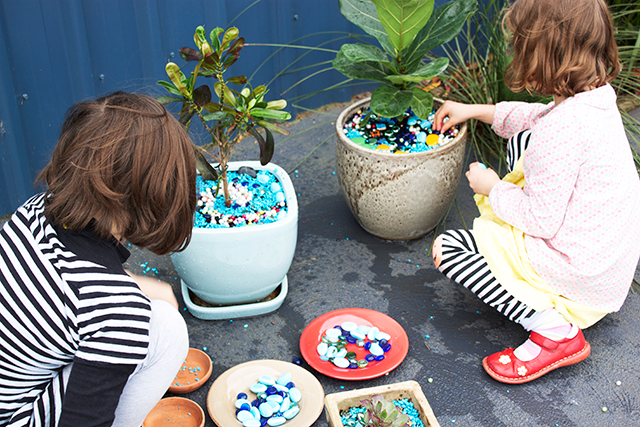
This blog post is about a creative garden art project I did with the kids. Decorating plant pots.

Or as we called it whilst we were doing it: cheats mosaic!

We've worked on a few crafty projects these just-gone school holidays. Not as many as I would have liked, but then again do we ever do all the things we put on our to- do lists!?


Decorating, or "mosaicking" these plant pots was a fun activity to do with the kids; it felt like a craft project, but involved no glue or paint, and was easy, and the kids had a ball!

We called it "cheats mosaic" as we were "mosaicking" the surface of the plant pots, but just arranging our decorative tiles, glass pebbles and beads on top of the potting mix. The decorations act as a mulch too, so this is a bonus :)

This would be a fun project to do with young kids, as it's so easy and the little ones would be quite pleased with their results.

We gathered our supplies which included mosaic tiles, coloured garden pebbles & rocks, glass pebbles and some beads. Buttons would also work! I get my supplies from all over but try specialised mosaic suppliers, hardware stores or tile shops for tiles, garden shops for decorative pebbles & rocks, and $2 stores, and crafty stores for various other bits n bobs.

The mosaic supplies are so fun to play with & organise

Once we had all our supplies all set out, we simply went to work "mosaicking" our pots. 


Miss 8 went for a spiral design, whereas Miss 6 went for a hodge podge! I thought she was going really well and should've stopped earlier, but adding more and more beads was just too fun and tempting. I did not impose my design opinions on her though; I let her be free with her creativity!


We now have some cute pots to place around the house. I'm sure they will get tampered with, but that's ok. I loved that the girls had a great time with it and it was more about the experience and process of creating. I might run out of a certain tile whilst mosaicking in the future, and have to  borrow some of these... shhhhh :)

Who loves pretty, shiny things!?


So, who says you need to use neutral mulches for your pots!? 

If you're into colour in your life this is a creative idea for adding some colour into your house in your indoor pots. Or outside pots. 

I love garden art.

I could totally see this used as a project for kinder kids making a gift for Mother's Day, using a small potted succulent with all the decorations that the kids could place in. Fun.

Jules :)

LinkWithin

Related Posts Plugin for WordPress, Blogger...
01 09 10