Showing posts with label Upcycling. Show all posts

September 24, 2020

DIY Home Decor: Chevron Pattern Stamped Curtains

Hi creatives!

A DIY Home Decor craft project today, chevron pattern stamped curtains, that has literally taken me forever to get up here on the blog!


I had some old random curtains that I thought needed a bit of work. I sewed two different curtain sets I had here together because the window I have is large. 

To make these stamped curtains you will need:

- plain curtains 
- piece of wood plank off cut for the stamp back (mine measures 14 x 33cm or 5.5 x 13")
- craft foam 
- white block printing ink 
- fabric paint additive (optional)
- block printing brayer (roller)
- piece of glass
- craft glue 
- scrap fabric, scrap paper, spatula to scoop paint, rags for clean up, glue stick & sticky tape 

You'll need a large flat surface to print on- the floor is good or a table but make sure it's protected with drop sheets. My floorboards are textured so we found a long, wide piece of laminate wood in the garage that I put under the section I was printing on.

You may want to add a craft fabric paint additive to your paint, which will turn your creation washable. You will need to heat set this with an iron according to manufacturers instructions. I didn't do this as I didn't have enough left and was too lazy to go buy some and even lazier when it comes to washing curtains, so these will probably last me a long time! ;)

I started by doing a quick drawing of the pattern I wanted, and then cut out strips of craft foam to glue to my wooden block. I drew a line down the middle of the wood so I could make sure my foam pieces were centred, and I used a little paper template to make sure all the angles were the same, and glued them down with craft glue. (My foam pieces measured approx 85 x 8mm or 3 3/8 x 5/16")
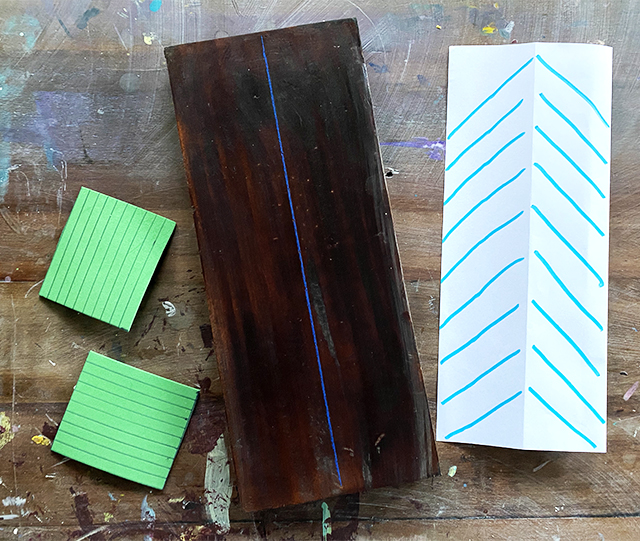

*After testing the print, I added a second layer of foam strips to the first one to be more spongey, it enabled me to get a better more uniform print than just one later of foam.*


Once I had my stamp made (and let dry overnight), I made a test by stamping on paper, but before lifting trace around the stamp and cut the print out. It was then glued to the top of the wood (just with a glue stick) so that when I used the stamp I could see exactly where the print was going to be. I covered it with tape for extra protection, as the stamp needed to be washed out after each use and I did this project in multiple stages.


Using block printing ink (add your fabric additive here if using) and a brayer roll out an even layer of ink, then use the brayer to roll the ink on your stamp. Do some test printing on scrap fabric until you work out the amount of ink you need and pressure to get a good print. I literally stood on the back of my stamp every time I printed, as that gave me a stronger print.


Make sure your surface is protected with drop sheets, and that also your work surface is smooth. I used a long piece of laminate wood that I had in the garage as my floor is textured and my table tops are all wonky (natural wood!). 

Use some scrap paper to cover places like the curtain tabs at the top, that you do not want printed, then you can get your pattern all the way to the top. (Not like in this below photo! I fixed that up later on!)


I went all the way down one side of one curtain with the pattern, then I started the next line by placing the stamp down and then measuring with measuring tape where the edge of the stamp was, then marked with masking tape all the way down the length of the curtain so that my pattern didn't go off track. I did this for each new line of stamping.


I then continued on in stages, letting some dry so I could fold the curtain up and stand on the dry parts, and then continued. My curtains were quite wide so it may not be as big a job for you as it was for me!


Done! DIY home decor in the form of stamped chevron patterned curtains. I hope you liked this tutorial!


Jules :)

February 18, 2020

Sewing Table DIY Furniture Upcycle

Hands up who likes a before and after DIY furniture story!?

The finished table...

I am loathe to spend too much money on stuff inside the house. It seems like wasted money sometimes and if I can come up with a cheaper way of making things look good, well then, why not?

And as much as I love interior design shows, it all seems very wasteful to throw away things and get new stuff, just because we like a different look or style. I mean, some people in the world live in tin shanties and huts, and we need to rip out our old tiles because the colour is a bit daggy? We are very spoilt!

I am no saint and we do a lot of things in our house requiring new materials and funds, and I won't rule out ever removing tiles in my home, but I do love to think creatively when it comes to what I already have.

I had this sewing table that I bought for $4 from the op shop. It's nasty! I bought it quickly when we were setting up our house as I just needed a table. I was pretty proud of the cost :) Though recently I was looking into new ones and was going to throw this one to landfill, when I started wondering if I could save it.

(insert horror screaming soundtrack!)

Painting this thing would've looked terrible due to the worn away veneer revealing chipboard, so my solution was to cover it with oilcloth, which is essentially fabric covered in plastic, and nail it on with some upholstery tacks. I stretched the top piece on (after ironing on low) like a canvas, stretching it and tacking it from the middle one way then the other, and then working my way out to the edges of the table.

This is the desk upside down

I wrapped oilcloth around the drawers and tacked it on from behind. I glued the drawer back together with PVA, and spray painted the brown plastic handles. New handles probably would've looked nicer, but once again, it had handles, and this challenge was after all about not sending bits of it to landfill.


And now I have a cute little sewing desk! The bonus of which is anything you're sewing glides easily over the oilcloth and doesn't snag on that terrible rough chipboard that is now sneakily hidden.

Now if anyone could come and un-jam my sewing machine from me letting kids use it, I would be most grateful!! 


 Jules :)


July 23, 2019

DIY Pistachio Shell Mosaic Craft

I have an easy DIY craft project for you today using something that would normally be thrown away.


How can one be creative, and eat pistachio nuts and not hoard those cute little shells for a mosaic craft project!? (Unless you don't eat nuts that is...)

You will need:

-Plywood or masonite panel in your choice of size
-Tile adhesive (I used a premixed indoor adhesive)
-Pistachio shells
-Acrylic paint
-Acrylic gloss sealer/varnish

Start by spreading your adhesive over your wooden panel. I love this part, it's so like icing a cake :)

Press the shells into the adhesive. You can go totally random or do flower or spiral shapes if you like. Let dry fully.


Once dry you can start painting the shells in colours of your choice using acrylic paints.


Add any interesting paint effects like spots, stripes or variations of colour. Keep these colours bright so they will contrast with the darker colour we will add later. (They kind of remind me of easter eggs!)


Once you've painted all of your shells, coat in acrylic gloss and let dry overnight. (You want the gloss to be fully cured as we will be wiping it back and we don't want it to shift.)


For my pretend "grout" colour, I made a runny mix of deep purple paint, and painted it over the surface and then wiped the shells back with a just-damp cloth. Rinse your cloth out when it gets too dirty.


Use the deep purple paint to do any touch ups to your "grout" with a fine brush.


I made a little wooden frame for my pistachio shell mosaic craft, but you can display as is if you want!


I hope you enjoyed this DIY craft!

Jules :)


March 18, 2019

DIY Painted Picture Frame

Hello Creatives!

A frame painting craft tutorial for you today. The end result is a textured frame that looks like it has some history... It has the look of having being painted a few times, but that is due to the texture that we will achieve through using paints and an acrylic gloss medium.


First, gather your supplies. Acrylic paints (Jo Sonja's acrylic paints are my pick), an acrylic gloss medium or varnish (Matisse Polymer Gloss Varnish is my fave), some fine sandpaper, and of course a frame and brushes and paint palette. Tissues will also come in handy.

When choosing a frame to paint, you want to grab something that has some different levels and surfaces. Some texture like flourishes or flowers would be even more interesting! I got this one from an op shop. 


There are no hard and fast rules when it comes to painting your frame. Choose whatever colours you like. You could find an image with colours you love and try to replicate them into your frame.

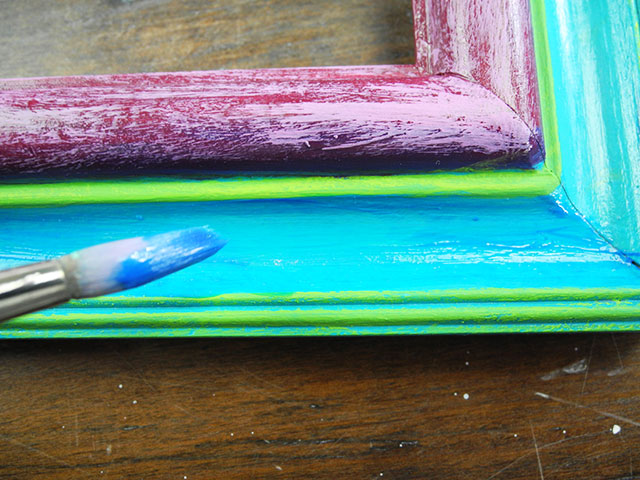
After removing the backing and glass and giving my frame a light sand, I chose to coat my frame in two colour to start with. Turquoise, and a deep pink.

I then coated the frame with the acrylic gloss.


Once that was dry I mixed up some lighter pink and brushed a bit off onto some paper to 'dry' off my brush a bit, and then dry-brushed it onto the deep pink colour. I highlighted some of the thinner details of the frame with some bright green.


Then I mixed some pthalo blue with some of the varnish and brushed it over the turquoise. Use a damp (just damp- not wet) tissue to rub parts of this paint mix off before it has dried, leaving some areas darker than others.


I then added some orange paint by painting it onto a scrap piece of paper and rubbing it over the frame. I also did the same with some bright pink which you can see in the end photos.


Next up, I mixed up a lighter turquoise paint with some gloss varnish and scrumbled and painted that in random places all over the frame. I decided I would like to bring out more of the green layer so added some more highlights in using some yellow paint. I also used the pthalo blue mixed with some gloss to go over the pink part of the frame, using my tissue to wipe parts of the paint back, leaving darker areas especially in the recessed areas of the frame.

mixing paint :)

You could go nuts by adding more colour by dry-brushing, or adding more coloured gloss mixes, or scrambling more paint over it using the scrap paper. 

Once you're happy with the look of your frame, give the whole thing one final coat of gloss varnish.


So you can see how layering up the paint and gloss quickly adds texture & and the look of lots of layers. You can really play around with the techniques described to come up with your own unique frame in your choice of colours. Let the frame dictate to you by it's unique shape how it needs to be painted, and most of all, have fun!


Jules :)

November 22, 2018

Make Christmas Decorations: Tutorial for Upcycled Marbled Polymer Clay Christmas Ornaments

Hello Creatives :)

Christmas is coming! If you're feeling like a Christmas craft, you can make these Christmas decorations. This tutorial combines polymer clay, old candle lightbulbs (which no self respecting hoarder, ahem, crafter can throw away), and washi tape. And for those of you who prefer the video format for craft tutorials, you can check out my second-in-my-whole-life-youtube-video! (Making videos is super new to me so I totally welcome feedback :))


Upcycled Polymer Clay Christmas Decorations


You will need:

-Polymer clay in various colours (Sculpey III brand is my pick)
-Old lightbulbs
-Glass or tile work surface
-polymer clay rolling pin (I use an even sided glass)
-Scalpel
-2 Pliers
-Wire
-Washi tape
-Silver leaf (optional)

Make:
Roll a selection of colours into snakes or worms or whatever your chosen word is for rolls of polymer clay :)


Twist them together into a happening party;


And get that party pumping by clumping them into a ball! (Permission to roll eyes now omg, I'm sorry- I will stop!)


Then roll your clay into a log once more, then twist and roll into a ball. Do this a few times (I like to do this around 3 times) and your clay will start to marble. Experiment to see what you like. The more you mix, the more marbled your clay will be. Over mix and your colours will all blend and mix together and you will lose the marbled effect. You will see the marbled effect the clay has once you start rolling it out.

Take your rolling tool, like my high-tech even-sided glass shown here, and start to roll out your clay. This is where you get to see the magic of your marbled polymer clay! Roll it out quite thin, about 1-2mm. It's opaque so you don't need to worry about seeing through the clay, you just want to make sure it's not so thin that holes start to tear into it.


Take one of the lightbulbs and wrap the clay around it, manipulating it and smoothing and pressing as you go. Trim the excess clay and use your fingers smooth and disguise joins. 


If you'd like to use the silver effect, press your clay onto a sheet of the silver leaf, gently sticking the leaf to the clay. Do this once you've first flattened the clay a little, then continue rolling the clay and the silver leaf will start to crack and give that distinct look you see below. Keep rolling until it's thin again.


Wrap around another lightbulb then trim and smooth as above.


Once all smooth and done, bake the lightbulbs in the oven according to the instructions on the pack.


Now to make the hanger. Take a length of wire and make two small loops in the ends using two pairs of pliers helps here. Thread another length of wire through these loops and use that piece to wrap around the base of the lightbulb end.

You then take some pretty washi tape and wrap it around the unsightly lightbulb end to make it pretty! It also doubles up it's purpose by holding the wire in place.


I'm pretty pleased with the outcome of this Christmas craft! You can make them in your own individual colours, and they would make great handmade gifts for the festive season too.

So, if you find yourself with some spare time that you just don't know what to do with, and you have a collection of old lightbulbs like I do, then give making these Christmas decorations a go!


I hope you enjoyed my my DIY Christmas decorations tutorial!

Jules :)

LinkWithin

Related Posts Plugin for WordPress, Blogger...
01 09 10