Showing posts with label Tutorials. Show all posts

May 04, 2020

Marbled River Rocks

Today I am showing you a Marbled River Rocks garden craft! It's a fun & easy DIY, and a great way to get more colour into your garden.


You can watch my youtube video below for this craft, or you can keep reading below.


Start with some smooth river rocks spray painted white and some Easy Marble paints. Easy Marble paints are waterproof and lightfast; which make them perfect to use for a project that will be outdoors in the elements.

*For my fellow Aussies you can buy Easy Marble paints through Art House Direct


You take a container large enough to fit your rocks in, fill with water and drop 2-3 of your chosen colours into it. The paints will sit on the surface of the water.


Take a stick and swirl the paint around. It dries pretty quickly so I tried to work fast.


Take one of your river rocks and submerge it into the water. Before you pull the rock back out, swish any extra paint still floating on the surface of the water away from the rock so you don't get a double-up of colour on its way out. Also, make sure you're wearing gloves: the safety recommendations for the paint states that you should avoid skin contact.


Ta da! Once you've marbled one rock, use a scrap piece of cardboard to lift any remaining paint out from the water surface ready to marble another rock. Make as many rocks as you want!


Someone had fun placing them in the garden!


Jules :)


March 04, 2020

DIY Craft: Paper Mache Trinket Box

DIY craft time! A free tutorial for you on how to make this paper mache trinket box.


This tutorial featured recently on alisaburke.com. Here it is on my lil old blog, but in a different colour way.

Paper mache is wonderful as it’s super cheap to make any sort of shape, limited only by your imagination! I wanted to make a small trinket box.

You will need:

-foam core board
-thick card (that can still bend easily)
-newspaper
-blank newsprint or butchers paper
-masking tape
-PVA glue
-craft glue
-air dry clay
-gesso
-acrylic paints
-gold acrylic paint (optional)
-gloss varnish

I started by finding a small bowl to use as a template for the lid and base of the box. Trace around and cut 2 from foam core board. 


I then cut from thick card a length 2” wide, and a small strip 3/8” wide. Make sure these are long enough to fit 1/4” inside the circumference of your base and lid. Tape the wider one into a circle, then tape this circle to the base using masking tape. Do the same with the 3/8” piece, keeping in mind that it needs to sit in a smaller circumference than the base walls, also taking into account a bit of padding from the paper mache layers. My inner rim sits about 1/2” in from the lid.


Using newspaper strips and a mix of PVA glue watered down slightly with water (approx 1:1) cover all over the base and lid, making sure you overlap the paper strips as you go. I then do another layer in plain newsprint so I can see where I’ve already covered. Let dry.


Using air dry clay, roll out a small slab to a little under 1/4” thick. Cut a leaf shape out with a blade, and smooth the edges using a bit of water and your finger or a clay tool. Roll three small balls of equal size for the feet and gently press down with something flat to make the balls slightly flat on the top and bottom. Let dry.


Once the clay pieces are dry, use clear craft glue to glue the feet onto the base, and the leaf shape to the lid. Allow to dry.


Gesso the whole box and lid, inside and out, including the feet and handle.

Now it’s time to paint! I chose to draw some simple leaf shapes, then painted around them and added wiggles, stripes and dots. You can copy my designs or come up with your own! Adding gold paint around the rim is a fun touch too. 


After decorating, I used water based gloss varnish everywhere except inside the box, and the inner rim of the lid, as my varnish can get a bit tacky when varnished pieces touch, as I discovered in my sketch book!


Now you have a gorgeous box to stash some special treasures!

Jules :)

September 11, 2019

DIY Craft: Faux Weaving


Hello Creatives!

I have a fun DIY craft today: faux weaving. 

I'm sorry I have not been around much! *cry* In all honestly I think I was suffering the winter blues and have had a long stretch with no inspiration. It happens to us all!

But something colourful is sure to cheer us up ;) And the sunshine that is out today. Sunshine helps!

This faux weaving was made by sewing wool, threads and trims onto a fabric panel. A look around your craft or fabric store will no doubt find you some interesting options & trims for creating your own faux weaving.

This wasn't a super quick project, but I'm liking the way it turned out and will feel quite happy with this hanging on my wall somewhere. You could squeeze it into a lazy weekend.

You will need:

- fabric for backing 19' wide x 20" high (48 x 51cm)
- various wools/ yarns/ threads/ trimmings/ pom poms etc
- Yarn needle with sharp end
- wooden skewer
- dowel rod (I used a piece of bamboo)


Sew hems 1/2" (1.5cm) down the sides of the fabric. Add a hem to the top making sure you leave enough space for the dowel to go through. I didn't hem the bottom as that was the selvage and will not fray.

Start decorating! Below here you can see I've added long running stitches and then loosely woven thick wool through them. 


Thick roving looks amazing. I stitched it down with vertical stitches as I went across. Once I did a row of this, I went back and did another row, mirroring the way I'd stitched the previous row.


I sewed down some random pom poms from my stash, and then made smaller little tufts by stitching loops in the fabric and then cutting them with scissors. A row of these would look good!


I also included lots of running stitches, sewing down multiple strands of wool, and sewing down thick wool but leaving little loops protruding randomly (above photo).


Lengths of wool looped at the top were added along bottom of the fabric. I found if I only looped over stitches it didn't look as neat, so I used a skewer to pull the loops tight and then sewed them to the bottom, then pulling the skewer out. I trimmed all this bottom hanging wool to a triangle shape.

Overall I'm pretty happy with the result! A fun project if a real weaving seems a bit intimidating for you!


July 23, 2019

DIY Pistachio Shell Mosaic Craft

I have an easy DIY craft project for you today using something that would normally be thrown away.


How can one be creative, and eat pistachio nuts and not hoard those cute little shells for a mosaic craft project!? (Unless you don't eat nuts that is...)

You will need:

-Plywood or masonite panel in your choice of size
-Tile adhesive (I used a premixed indoor adhesive)
-Pistachio shells
-Acrylic paint
-Acrylic gloss sealer/varnish

Start by spreading your adhesive over your wooden panel. I love this part, it's so like icing a cake :)

Press the shells into the adhesive. You can go totally random or do flower or spiral shapes if you like. Let dry fully.


Once dry you can start painting the shells in colours of your choice using acrylic paints.


Add any interesting paint effects like spots, stripes or variations of colour. Keep these colours bright so they will contrast with the darker colour we will add later. (They kind of remind me of easter eggs!)


Once you've painted all of your shells, coat in acrylic gloss and let dry overnight. (You want the gloss to be fully cured as we will be wiping it back and we don't want it to shift.)


For my pretend "grout" colour, I made a runny mix of deep purple paint, and painted it over the surface and then wiped the shells back with a just-damp cloth. Rinse your cloth out when it gets too dirty.


Use the deep purple paint to do any touch ups to your "grout" with a fine brush.


I made a little wooden frame for my pistachio shell mosaic craft, but you can display as is if you want!


I hope you enjoyed this DIY craft!

Jules :)


March 18, 2019

DIY Painted Picture Frame

Hello Creatives!

A frame painting craft tutorial for you today. The end result is a textured frame that looks like it has some history... It has the look of having being painted a few times, but that is due to the texture that we will achieve through using paints and an acrylic gloss medium.


First, gather your supplies. Acrylic paints (Jo Sonja's acrylic paints are my pick), an acrylic gloss medium or varnish (Matisse Polymer Gloss Varnish is my fave), some fine sandpaper, and of course a frame and brushes and paint palette. Tissues will also come in handy.

When choosing a frame to paint, you want to grab something that has some different levels and surfaces. Some texture like flourishes or flowers would be even more interesting! I got this one from an op shop. 


There are no hard and fast rules when it comes to painting your frame. Choose whatever colours you like. You could find an image with colours you love and try to replicate them into your frame.

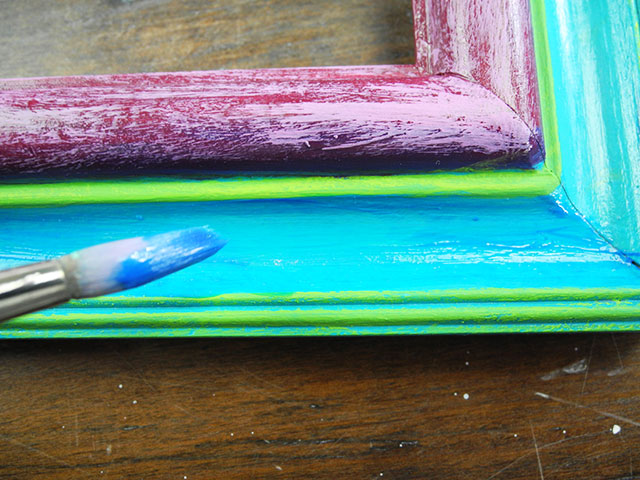
After removing the backing and glass and giving my frame a light sand, I chose to coat my frame in two colour to start with. Turquoise, and a deep pink.

I then coated the frame with the acrylic gloss.


Once that was dry I mixed up some lighter pink and brushed a bit off onto some paper to 'dry' off my brush a bit, and then dry-brushed it onto the deep pink colour. I highlighted some of the thinner details of the frame with some bright green.


Then I mixed some pthalo blue with some of the varnish and brushed it over the turquoise. Use a damp (just damp- not wet) tissue to rub parts of this paint mix off before it has dried, leaving some areas darker than others.


I then added some orange paint by painting it onto a scrap piece of paper and rubbing it over the frame. I also did the same with some bright pink which you can see in the end photos.


Next up, I mixed up a lighter turquoise paint with some gloss varnish and scrumbled and painted that in random places all over the frame. I decided I would like to bring out more of the green layer so added some more highlights in using some yellow paint. I also used the pthalo blue mixed with some gloss to go over the pink part of the frame, using my tissue to wipe parts of the paint back, leaving darker areas especially in the recessed areas of the frame.

mixing paint :)

You could go nuts by adding more colour by dry-brushing, or adding more coloured gloss mixes, or scrambling more paint over it using the scrap paper. 

Once you're happy with the look of your frame, give the whole thing one final coat of gloss varnish.


So you can see how layering up the paint and gloss quickly adds texture & and the look of lots of layers. You can really play around with the techniques described to come up with your own unique frame in your choice of colours. Let the frame dictate to you by it's unique shape how it needs to be painted, and most of all, have fun!


Jules :)

LinkWithin

Related Posts Plugin for WordPress, Blogger...
01 09 10