We recently did some room shuffling in our house, and I moved studios. The room is slightly bigger with more storage than my last studio, but with all my stuff in there it looks small again! Oh well. I have plans that when my kids are all grown up and moved out I will take over so many rooms.
Imagine that! A designated room for each area of my work.. a sewing room, a clay room, a computer room, a painting room. One can dream, ha!
I'll share some finished photos of the whole studio soon, but for now I'm showing this one corner. (I really need to clean the rest of the studio and I'd like to buy an outdoor rug to save the floor from a bit of paint.)
Here are some of the progress shots of the wall mural in progress:
I used a mix of student grade acrylics and house paint sample pots from the local hardware store.
And some more photos of the finished wall mural:
The pre exisiting-shelves are handy to keep artworks-in-progress on, little creations and collectables.
I hope you enjoyed looking at this part of my new studio! I had a lot of fun painting this new mural.
I'm sharing with you my latest creative home decorating project, my youngest daughter's new African jungle safari themed bedroom, complete with a new mural!
The mural requests were: jungle themed and needs cheetahs and a python in it.
The big paper mache tree was made a while ago in my girls' previous bedroom, but as they're growing older I felt they needed their own space and so a new bedroom was made free, and the tree found it's new location in this room. I have received many questions about the construction of the tree in the past so I will elaborate on the how-tos in a future blog post.
I'd always dreamed of doing up my own kids rooms before we even had kids. The problem is they're so quickly growing and won't be kids for much longer, so I thought, it's now or never!
My youngest used to have a pretty white iron bed, which didn't really fit into the new bedroom's theme. Husband wasn't keen to buy a new bed considering she had one already that was working perfectly fine. Then by a strange coincidence, a friend showed me a photo of the bed below at school one day saying she was getting rid of it, and would I like it, FOR FREE. She also threw in the green wool rug AND the 10 metres of white fabric. Friends that declutter are the best! Thanks, Steph!
I tea-stained the fabric by soaking it in the washing machine with all of the tea bags from my canister brewed in boiling water and then tipped into the mix. After 24 hours of soaking, I put on a spin cycle. I didn't bother rinsing as I wanted to keep as much of the staining in as I could.
I then sewed the fabric into a tent to fit over the bed. That sounds so simple, but it was blood, sweat, and tears! I remembered whilst sewing why I tried to con my Mum into making it for me, with no luck. (She is such a good sewer though, it would have been a piece of cake for her.)
Someone feels right at home in her new safari tent bed. My daughter likes it too! :)
The gorgeous snow leopard art print on the wall is by the super talented Sofia Moore. I absolutely love how it's a snow leopard, but it has prettiness about the illustration too. Because even though my little girl is into leopards and pythons (bats, lizards, and spooky movies) she is also very much into pink, sparkles, and pretty too! When my daughter saw this print, she made cutesy noises and wanted to cuddle the leopard :)
The tree needed some paper mache repairs to it and a bit of fresh paint. It's big enough for a kid to sit and stand in, and the little 'windows' have ledges so that toys can sit in them. The kids can also peer out of them from the inside, too.
Oh, hello there little tiger!
The room is now perfect for my girl's ever-growing cat soft toy collection :)
I didn't want to cover the whole wall with the mural, as I wanted some space for furniture underneath.
A handmade mini tree ornament we found at the local Arts Market doubles as a jewellery holder.
I found both the curtains and the vines on eBay for a steal. Other than buying a tonne of paint to cover the previously dark walls (about 5 freaking coats!), this project was pretty budget friendly.
I recorded the whole painting of the mural in time lapse! Which you can see on my very first youtube video:
The curtains were such a happy find. They are just cheap ones but they really compliment the room and fit the theme.
Detail of a corner with some personalised touches below. My girl's treasured Steve Irwin shirt from the year she raised money for wildlife as a Wildlife Warrior, a little shadow box for collections (also from Steph), and a customised anime picture from a good friend.
I also painted ombre walls in the colour of a pale African sky. (Which would have matched my original African plains theme, but whilst we were buying paint youngest informed me it needs to be jungle themed. Oh well, go with the flow!)
I had such fun decorating this room!
I have a lot of work ahead of me completing new bedroom #2 for my eldest daughter, my new studio (as we're doing a room swap), and the main bedroom that the husband and I have just moved into. Oh my! Almost makes me want to sit in bed and binge watch Netflix it's so overwhelming!
The old suitcase used as a side table belonged to my Grandpa. A sentimental touch :)
I hope you have enjoyed reading about our new African-jungle-safari themed kids room as much as I enjoyed making it.
If you have any questions, please feel free to post them below.
I have been following Kristin Nicholas on her blog Getting Stitched on The Farm for a while now, and what I love about her is that she seems genuinely motivated out of the pure love of creating, to decorate her home and make things. She doesn't follow trends, she just has a love for pattern and colour that transcends the latest fashions. It's a true love affair, not just a fling!
This post contains affiliate links (see bottom of post for explanation). So when I found out she had a new book out, Crafting A Patterned Home, published by Roost Books, I didn't hesitate, I didn't even read about it, I just jumped online and bought it!
I am, like Kristin, intoxicated by pattern and colour and love home decorating. Sometimes I walk into a minimalist space and find some peace and a breath of fresh air, but after a while, I grow bored. Pattern and colour excite me. So clearly I feel like I have lots in common with Kristin.
She has covered the walls in her home with hand-painted patterns, and objects such as lampshades and furniture are not safe... there's even a bath! In this book, she shares how she has done it.
Kristin talks about her previous book Crafting A Colorful Home in this video below, but you can get a sneak peek into her colourful life.
So even though I can appreciate a nice calm neutral home, when I saw Kristin's via this Houzz video I sat there absolutely enthralled. I just would love to sit in her loungeroom with a cuppa and cake and absorb all that pattern into my soul.
Kristin also includes some words of encouragement for the novice or the unsure (scared?) on how to get started.
She gives in-depth advice on how she creates her rooms. One of my favourite snippets of advice she gives is don't make your rooms too "matchy-matchy". I've always agreed with that line of thought; less matchy-matchy makes for a more personalised, interesting home. If all of your furniture is the same design, your rooms might end up looking too much like a furniture display store.
There's a lot of advice on colour, how to think about and design a room, and techniques and tools. There are projects for each space of the house, kitchen & dining, living room & library, bathroom and bedroom, and then outdoor spaces: pottery studio and garden shed, and in the orchard and under the pergola. And of course, if you don't have a pottery studio or pergola, you could make projects for your potting shed or outdoor deck for example.
Such as the one in the image below. I really want to do this with the chook pen window!
The book is bursting with colour, and as a creative person myself, I find it very motivating and I'm eager to try some of the projects in the book.
Thank you Kristin for a lovely book! It's going to slide out of my bookshelf and appear on my coffee table frequently!
*Affiliate Information: Affiliate links help me earn small commissions on products (at no extra cost to you), which helps support my love of blogging and sharing creative things. I only ever recommend or link to products that I'm genuinely into or would use.
Hello! My book project is nearly done, so I will be back babbling on here again in no time. I am dreaming up lots of outdoor crafty projects, as I want to get outside and away from the computer now that the weather is warming up. I'm thinking mosaics! And cement! I have caught the cementing bug :)
We have mostly an Australian native garden here but I still manage to find some colour for a vase
Spring has arrived in the land down under and it is a sight for sore eyes. I think the winter just gone was the coldest ever, or maybe it's just that I'm getting older? I'm not built for the cold.
Another reason for getting outside more is this little guy:
Meet Archie! The cheeky fluff- ball bundle of mayhem! Our newest family member.
And in honour of our not-too-long-ago-passed previous fur babies, I have finally made them memorial stones for their graves in the backyard. That was a project I'd been meaning to do for a long time. I have made it into a tutorial too, as I couldn't find instructions online specifically for what I wanted, so stay tuned for that one.
Another thing that's been taking up a lot of my time is cooking. Miss 6 has been put on a special diet by her integrative doctor which is similar to the paleo/ gaps way of eating. I'd go into why, but don't really want to get into finer details but I will say that I think functional/ integrative medicine is the way of the future! I'm doing the diet too as I just feel so much better when I eat this way. I do it mainly to tackle some niggling health issues that I have. I always believe in addressing the root cause of issues and asking the question "why?" Because I'm never satisfied with "it just is." :)
The authors healed ailments such as eczema and OCD through diet, and this just fascinates me no end.
Mmmm veggie seaweed crackers and baba ganoush- from the book
Gluten free sausage rolls with homemade tomato sauce (both in the book) with a side serve of steamed cabbage and kombucha
I just wish I could eat this way and not have to make all of it. And the dishes are mountainous! I've started asking the kids to help me with washing up, and they can earn a bit of pocket money on the side.
So combined with puppy mayhem (it's like having a baby again!), masses of cooking, and the kids book I've been working on, things got a little crazy busy. I'm looking forward to chilling out a bit more in the warmer weather and focussing on what's important, and not trying to do everything and be everything to everyone. I think as mama's or even women we can easily get stuck in that trap, until we realise we must do some tweaking for everyone's sanity and ease back on some things. Hence the break from the blog. And I decided, that was OK.
Here's another little snippet from the book:
This dog is quite small within the illustration I did for this page, but I'm interested in enlarging parts I've done so I can see individual line marks and colours. I love seeing brush stories and paint marks.
I'm at the stage now where I'm touching up and editing images, so... nearly there.
Today I'm reviewing the home decorating book "Happy Home: Everyday Magic for a Colorful Life" on the blog.
I was happy to have a fellow internet- friend artist and reader recommend this home decorating book to me after my last post on two awesome decorating books. This book fits into the same category as the other two, in that it's colourful, inspirational, and one of those chuck-out-the-rule-book books that encourages you to follow your own heart rather than some sort of defined formula for decorating your home.
This post contains affiliate links (see bottom of post for explanation).
I'm definitely a sucker for home decorating books that are in the colourful eclectic category. My only concern is I will sit down and spend too much time looking at beautiful books rather than decorating my home!
This book is by the founder of Rice Charlotte Hedeman Gueniau. It's no wonder that this book is fantastically colourful and inspiring when you have seen some of Rice's colourful products.
Some fun colourful products from Rice
The book goes through different sections of the home in detail, with inspiration and encouragement to play with colour and trust your choices.
I've been thinking of the fear we seem to have here of colour in Australia. I mean, I'm not sure you'd look at some bright pink flowers on a tree you've chosen for your garden and say... oh, I don't know, I might just get sick of that colour, better stick to white!
I am totally being cheeky right now. I get that people like neutrals, but I think it's sad when someone loves colour but they're too afraid to use it.
Colour makes me happy which is why I surround myself with it. So books like this easily win me over. You can see by these few photos from in my house why I love this style of book and decorating.
Images from my home
As I've mentioned before, I like home decorating books to have the perfect balance between words and photos. You need lots of photos in a home decorating book. And you need lots of tips and worded prompts to get you thinking about your spaces. This book has that balance.
Give me a shout if you have discovered a home decorating book I'd love.
Jules :)
*Affiliate Information: Affliliate links help me earn small commissions on products (at no extra cost to you), which helps support my love of blogging and sharing creative things. I only ever recommend or link to products that I'm genuinely into.
This post contains affiliate links (see bottom of post for explanation).
A rainy day off school saw us painting on our graffiti art wall which we haven't worked on for a very long time. It's a really fun, exciting and creative art project to do with the kids!
I love our graffiti wall! One which I join in with them too.
We have a dedicated wall for this. It's on one wall in our hallway. I must say it's getting a little easier as the kids get older to work on it. It was a bit tricky in the past when they were younger trying to tell them, "no we don't paint or draw on any other walls... except this one!" A concept sometimes hard to grasp for little ones. (They're going to draw on the walls anyway, right!?)
I don't like to have rules during art time, but here are some of my guidelines ;)
- It's this wall & this wall only!
- You may paint over old work if you want to. That's the whole point of the graffiti wall! But respect the new work that someone else is doing.
- For the parents: breathe, it's only paint!! You can always paint over it one day.
- Wear old clothes and an art smock. It can get messy.
This might not work so great in a carpeted area. This is an "at your own risk project"! Luckily we have vinyl wood flooring, so any spilled paint can be soaked and scrubbed away.
Hints for working on a graffiti wall:
- Use coloured pencils to make initial drawings. If you use water soluble ones, any mistakes can be wiped off worth a damp rag.
- Use cost effective student grade acrylic paints. When the kids were younger I used washable poster paint like these ones, because the paint had a tendency to spread through the house...
- Set everything up you need before starting: paints, palettes (one each), brushes, washing up water and rags.
- Make your art larger! This is quite tricky for my youngest to grasp, she still makes some little tiny drawings on the wall, but that's ok. I just let her go and do her own creative thing :)
- You need more paint squeezed out onto your palette for working in a larger area.
- Try different sized brushes to see how it works. You may find you like a bigger brush than you thought you would. Again, student quality brushes are fine for this project.
It's also a chance to teach about some colour mixing.
When we started out painting this graffiti art wall, it was during the day when my husband was at work. What a nice surprise he got when we got home! (I reminded him that he did marry an artist!)
I hope you enjoyed checking out our graffiti art wall. A super fun kids art project that is never ending. Update and repaint when the urge strikes.
Are you brave enough!?
Jules :)
*Affiliate Information: Affliliate links help me earn small commissions on products (at no extra cost to you), which helps support my love of blogging and sharing creative things. I only ever recommend or link to products that I'd use.
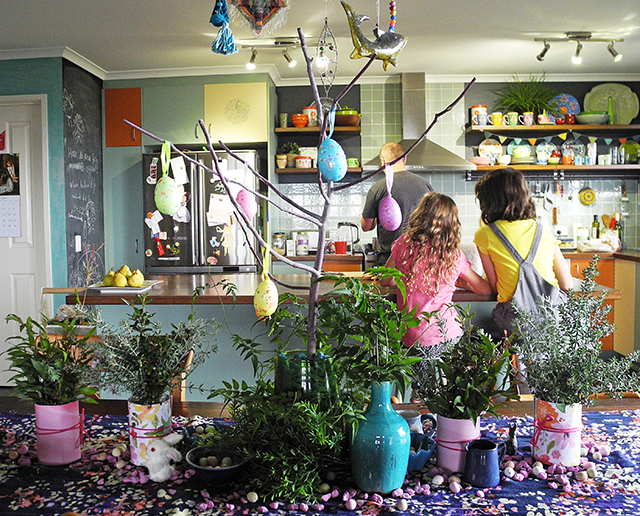
This Easter we decided to get all creative with a craft project that saw us painting wooden eggs, baking bunny cookies and making an Easter themed table centrepiece.
Here are our gluten, dairy, grain & refined sugar free (but delicious) bunny cookies. Our bunny cookie cutter was from the gorgeous toy shop Epoche, and we used this recipe to make the bunnies.
I didn't spend more than $10 putting this centrepiece together. The table "runner" is actually a scarf. The greenery is from the garden in jars with scrap book paper and tied around with pink string.
I asked Miss S for a few bunnies from her collection, and used some decorative ceramic pieces and other bits and pieces from my collection.
There are some little pink decorative pebbles that I already had in my craft supply stash. And the pom pom seemed to ask to be put in the mix :)
The decorative hanging eggs were from the dollar store. I love mixing in cheap things, with nicer pieces.
Happy family memories in the making...
Here is the Easter craft component: wooden eggs that we painted. We bought the plain wooden eggs from Winterwood Toys (which is a felt & craft supply store). They took us 3-4 painting sessions to complete. When we'd finished painting them we added some glue and glitter. We love using glitter in our craft projects!
The painted eggs looked right at home when they joined our table centrepiece.
Then, because I had used some candy covered chocolate eggs in the display, it was just a little too tempting for the kids! (I didn't tell them, as I was hoping they wouldn't realise. These kids can sniff out sugar a mile away!)
Lots of bunnies to play with...
Which egg to eat? So hard to choose!
In the afternoon the sun started streaming through the windows & the table display putting beautiful light through the decorations so I just had to take some more photos. Can you spot the tiny opportunistic spider on it's web!? Our display is living!
So that wraps up our creative Easter.
I hope you have a lovely, creative & safe Easter with friends & family.
Jules :)
Thanks to Arhaus for suggesting I come up with a creative table setting. I loved the idea so I did it!