November 06, 2015

A Mermaid Party!

Recently we threw a Mermaid party for Miss 5. It was my "Pinterest Party"! (They're only young once, right?) And in all efforts to stay true to our clean eating I also made a lot of the food.

First, I took one 5 year old and popped on a home made mermaid costume. (She has a pearl headband on too.) Mermaid tail instructions here, and the top was just two green felt shells sewn on to a pink singlet. I got the fabric for pretty cheap. I think this costume cost me all of $10 and didn't take long to sew.


A sweet little welcome sign drawn by Miss 7 to greet our guests. (It's a mermaid walking her merdog. Cute, huh!?)


The party room. Fairy lights, balloons, streamers for seaweed, and paper puff balls feature for decorations.


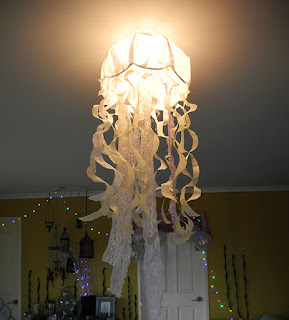
I made this jelly fish light by covering an old light shade frame with white rice paper, and hanging paper, ribbons and lace from the middle.


The cake! Whilst searching for ideas on Pinterest, I discovered sandcastle cakes! I love the fact that they look really effective, with no food colouring. In fact our party was an artificial-colour-free party, and the cake was made from spelt flour (an ancient form of easier to digest wheat). I made four cakes which I then cut up and stuck together with toothpicks and bamboo skewers. The cake was iced with plain butter frosting and covered in a sand mixture that was made from baked cake crumbs (like how you make breadcrumbs, but with offcuts from the cake), and shredded coconut whizzed up in my thermomix. 


I collected all kinds of sea themed decorations from around the house, like jewellery and shells, and I also found some things in the op shop. The toy shop had some play star fish. The seaweed grapes were another idea from Pinterest. The treasure chest was just a box I already owned. Chocolate gold coins worked well in that.


This is a mobile I received last year for a Mother's Day gift. Mermaid-y, yes? The fishy back drop was from the girls' dress up box.


Jelly cups were the natural coloured kind with a bit of the 'sand' sprinkled on the tops. Cookies were homemade in the shape of starfish and sand dollars. (Recipe here. Although I did use spelt and an extra cup or so of flour.) I used a star cutter for the starfish, and pinched each point skinnier to get a more realistic shape. (Thank you for that tip Steph!)


White and milk chocolate seashells with 'sand' were made a few days before the party.


The craft. A kids party will not be held at my house without a craft!! There was so much glitter and sequin-y goodness :)


Ta-da!


A painted shell for cute mermaid-y photos was propped in the corner. A bubble station provided some sparkly fun too :)


Party favours included some handmade shell necklaces with pearl beads & glitter, and some cute mini mermaid brooches I got from Etsy.


The party bags were paper (because paper is recyclable & if there's a more environmental choice, I will choose it. I struggled with buying balloons, as they don't degrade), stamped with a seahorse stamp that I made years ago with wash tape around the top. I included a couple of 'natural confectionary' lollies, but other than that there were the necklaces, brooches, hair clips and sea themed stickers. I hope the other parents appreciated the lack of extra sugar!


We didn't have one lolly on board (except for in the party bags) but the kids were really happy and there were no complaints. There was still chocolate and jelly and bikkies and fruit.. and cake! :)

I like to take my time and put thought into the best food choices for the party. For example, we had plain chips cooked in sunflower oil and seasoned with sea salt (a much better choice than cheezels, for example. I do lots of reading of labels in supermarkets.) We had homemade meatballs and chicken nibbles with a homemade marinade. Homemade bbq sauce, and an organic tomato sauce. We also had star shaped sandwiches which neglected to be in a photo. We had biscuits, cheese and a homemade basil pesto dip for the grown-ups. Our cutlery and cups were recyclable or compostable. Me being me, I can't do it any other way! I torture myself, I swear.

Oh, and we had a cute mini beanie boo turtle for the pass the parcel prize! I was going to make something for the prize (like I did for a dragon party we had in the past, but I ran out of time.)


It was a lot of work but careful planning got me there in the end. And then I collapsed into a heap when it was done.. And napped. I hope Miss 5 remembers it. I'm planning on getting a little album printed for her as a momento. 

I hope all the kiddies had a great time as I may never plan another party like this again. Although... how cool would a woodland themed party be!?

Jules :)

October 03, 2015

New Brooch Available

I have just finalised my design for this new brooch that has just been listed in my shop

It's a dreamy night time creature that frolics around in your sub conscious ;)

The original form was hand sculpted by myself and then I made a mould from it. Each is reproduced in polymer clay, and then hand painted. Because of the processes I use to create these they can be baked up to four times until each piece is finally finished. 

It's a unique piece of wearable art for inspired individuals! 


This art print is now available too. 

I'm starting to gear up for my local Arts Market coming up in a couple of weeks. I'll have some of my new items there, or you're welcome to get me to hold anything as I know there are a few interested in this print and they may not want to miss out! If you're local, that is ;)

Now I'm off to do some more crafting, I have some secret projects going on which is why I've been quiet of late. I'll try to show some more arty stuff soon!

Jules :)


September 28, 2015

2016 Calendars

I love calendars! Or anything pretty that I can put up on my wall. I love to see what new calendars come out each new year, and which of my favourite artists have created one. 

Another hobby of mine is looking at amazing work online (you may know that I am Pinterest obsessed?) So my combined interests of illustrated products & image searching have come together to bring you this curated list showing some of the calendars I have found. And now I'm sharing the love.

Which is your favourite? Have you discovered an awesome one I haven't shown here? I'd love for you to let me know.

Links to each are below the images.


I hope you enjoyed the selection. Now how do I choose just one!?

Jules :)

September 20, 2015

Cleaning, Clearing Out

With the onset of Spring and the sun beginning to shine it always makes me feel like getting things in order and decluttering. I've been blessed with a few hours to myself and have been spending them in the studio, not creating, but organising. My head feels clearer the more tasks I complete and I feel like I am making space not only for better storage of possessions, but making space for new opportunities, inspiration and creation to enter my life.


My small pieces of fabric, wool & wash tape storage.

I had a lunch break today eating food and devouring images of organising on Pinterest. (Man I love Pinterest. Do you follow me there?)

Decluttering info entered my life again recently when I listened to this podcast:
The Up For A Chat girls talking about Decluttering

It was a few weeks ago when I listened to it, but I loved the decluttering story from Cyndi O'Meara and how after she did it it brought new opportunities into her life.

I like to think of it as the universe only has so much for you, and you clear some stuff away then something else has space to enter you life, whether that's a new opportunity, venture, person...

I also read about this phenomenon in The Magic Art of Tidying Up. (Have you read this best selling book? I have started utilising her methods in other areas of my home too..)

So I will keep going with my cleaning & clearing and see what magic it can bring into my life.


I love to store items in tins, baskets, wooden crates or the like rather than plastic. I still have some plastic tubs, and I used to have a lot more, but when I come across a prettier item for the task the plastic gets demoted. 
There were a couple of really daggy magazine holders there on the shelf too, So I covered them with pretty paper :)


Another example of housing tools in containers other than plastic.


I also had some peg board installed in my studio. The thought here being when I'm working on a series I can hang them all up to see if they're all working together in a cohesive manner. 


I recently also had a bigger and better inboard installed. My light box for taking product photos has also moved off my desk and has it's own allocated space.

So there you have it. Far from finished,  but I feel good about progress I've made so far. My studio and headspace already feels lighter.

Jules.

August 14, 2015

My Creative Home Update & Cubby House!

I have officially declared Fridays to be my house day! Cleaning, and/or decorating. I quickly tired of vacuuming today (it's not finished) and decided to start getting into doing some stuff around the house. There is so much I want to do in this place, but I have not allocated any time for it. When the kids are not at home I'm focussing on folio/ illustration pieces, jewellery or private commissions. Then outside of that is looking after kids, cooking, cleaning and all the other junk that goes with life. 
I realised I hadn't actually allocated any time at all for doing the millions of things I want to do in the house, like sew cushions & curtains, paint walls, wallpaper, stick pretty bits of paper onto things, make light shades, make frames, rearrange stuff, declutter, etc, etc. Delegating these tasks is not an option because A. I am fussy. B. I want unique items for my home which usually mean quirky, handmade and expensive. & C. I can't find the things I want!! (Up your game Australia, we are so freaking boring and safe here! You just have to go and have a look at Anthropologie's homewares to see what I'm talking about. FFS.) 

So, today I decided to give the mural in the kids room another layer of paint. This is where I'm up to with this project.


And while I'm talking about colouring up the house, did you see the kids cubby that we finished not too long ago? We are super proud, and the kids love playing in it.


A thrifted light shade got a really quick makeover with bits of fabric and an upcycled necklace. I wasn't too concerned of the finish of this so basically I just got lazy and cut fabric to fit and glued them over the existing fabric. Sing song voice: Cheating!


We added a panel of wood offcuts to one of the outside walls that we all made as a family. Although this sounds lovely in theory, overly eager impatient children and outdoor wood glue don't really combine to produce a relaxing activity.

The painted panel was created by the girls with help from two of their friends.


I just love colour, texture, and pattern in my home. I just want to add a crazy amount of stuff to my house. Stuff minimalism! My recent source of inspiration and motivation to get going again with the home decorating is this book, Crafting A Colorful Home by Kristin Nicholas. You can read more about this book through that link, but I'll just quickly say that it's pretty good! I love reading about her homes story, and the thinking behind the projects she's completed in her own home. It is inspirational and has lovely photos for my eyes to gobble up. I borrowed this copy from our local library, which I usually try to do before purchasing a book to see if it's purchase worthy. Purchase worthy? Tick! 


So thanks for a lovely book Kristin, and I'll keep tinkering away on my colourful home, as it's a never-finished project and also my biggest art project of all time.

(I wonder what my husband will think of the 5 different multicoloured carpet idea I have for the stairs..?)

Jules :)


July 31, 2015

Freebie- Laundry Signs

Who doesn't love a freebie!? And organisation.. and getting kids to help out with the household chores!?

In an attempt to make chores fun for my kids I decided to label our laundry baskets. So I thought, why not come up with a cute illustrated sign that I could share with other Mums (or Dads for that matter), or even people with no offspring that just want to pretty up their laundry baskets? :)

Talking about Dads, the husband-guy who lives in this house could do with a bit of visual prompting to get his clothes into the right baskets... but I shall not elaborate on that here today...

Here are the signs, made with good old fashioned drawing and new fashioned photoshop (download links will be at the end of this post):


Go ahead and print your downloads out on whatever type of paper floats your boat. I used some heavyweight matte photo paper on a standard home printer. Cut those babies out, then decide how you are going to give them some longevity. I covered them- all crappily I might add- with some packing tape: Poor man's laminating! (Use what you have.) You may have a laminator. Or you may want to just blu-tack them to the walls or even pop them in cute frames. Again, whatever floats your boat.


I punched some holes in the edges and tied them to our laundry baskets with string. 


Now it's the kids turn to do the next step. And the, ahem... husband.

Enjoy.

Download the 'Darks' sign here.


(This is the first time I have offered a 'download' for a while. I'd be so appreciative if you could let me know if the links work!)

Jules :)

July 24, 2015

Gobbling Up Goodness..

..With my eyes! Books that look so good I could eat them!

I have been doing a fair bit of research lately on Children's Picture Books. And I love this area of illustration so much that I am just awe struck when I come across beautiful new books. It's a tricky area of illustration to crack into, which is why I feel truly blessed that I've been there before.

I have just ordered Oddfellow's Orphanage by the extremely talented Emily Winfield Martin. This is not a picture book but junior fiction, which has come out at the right time for my Miss 6 1/2 to read. She is becoming a regular book worm at night reading by the light of her bedside table lamp. This one's for her. She tells me "Mum, you like 'weird' don't you?" Yes, my love, I do. And she's following in her mother's footsteps. She's very creative and already sees things from an artists' perspective.


I love illustrations that are textured and have depth through they way they are rendered, such as with these two books. Oh, I'm sure "The Little Gardener" will be the next one that pops up on my credit card statement! Both published by Flying Eye Books. (Some really awesome books published there.)


And Elsa Mora has illustrated The Water And The Wild. (Also junior fiction.) I've been following this artist ever since way back when she first opened her Etsy shop. Lovely to see some of her work gracing this book cover.


Another of my favourite artists has illustrated her first book Sonya's Chickens. Her illustrations are so beautiful to look at. She has the right balance of elements that come together to make stunning pictures. This might just have to be ordered at the same time as "The Little Gardener"! 


So after feasting my eyes on lots of delicious new books as part of some inspiration for illustration work; I just had to share. 

Now I'll leave you with an image of a painting I was working on during last nights Art Jam session. Untitled as yet.


Catch you soon :)

LinkWithin

Related Posts Plugin for WordPress, Blogger...
01 09 10