I've recently been through some big personal changes, which has totally shifted my taste in art and therefore what I want to produce, and also the direction I want to take.
Although this has been unsettling for me, I'm through the shaky seas and I'm feeling optimistic and excited for new possibilities! I'm moving away from the blogging arena and sharing craft tutorials, and very much focussing on purely creating art.
I'm currently working on developing a new style, and I'm not quite sure what that will look like but if you'd like to keep up with what I'm doing and come along for the ride, please follow me on:
A DIY Home Decor craft project today, chevron pattern stamped curtains, that has literally taken me forever to get up here on the blog!
I had some old random curtains that I thought needed a bit of work. I sewed two different curtain sets I had here together because the window I have is large.
To make these stamped curtains you will need:
- plain curtains
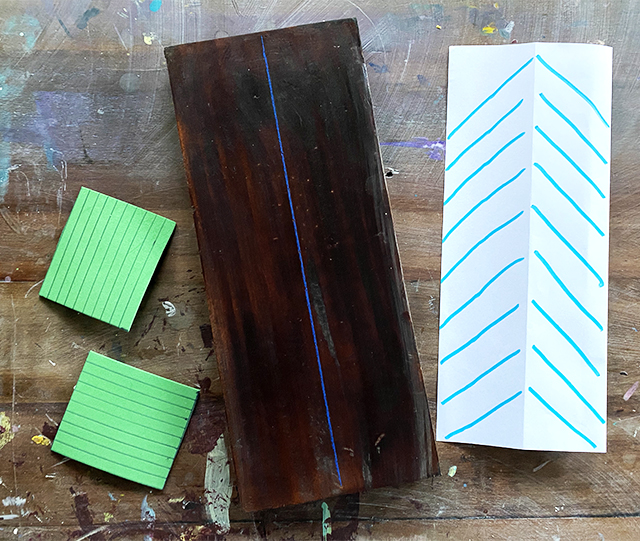
- piece of wood plank off cut for the stamp back (mine measures 14 x 33cm or 5.5 x 13")
- craft foam
- white block printing ink
- fabric paint additive (optional)
- block printing brayer (roller)
- piece of glass
- craft glue
- scrap fabric, scrap paper, spatula to scoop paint, rags for clean up, glue stick & sticky tape
You'll need a large flat surface to print on- the floor is good or a table but make sure it's protected with drop sheets. My floorboards are textured so we found a long, wide piece of laminate wood in the garage that I put under the section I was printing on.
You may want to add a craft fabric paint additive to your paint, which will turn your creation washable. You will need to heat set this with an iron according to manufacturers instructions. I didn't do this as I didn't have enough left and was too lazy to go buy some and even lazier when it comes to washing curtains, so these will probably last me a long time! ;)
I started by doing a quick drawing of the pattern I wanted, and then cut out strips of craft foam to glue to my wooden block. I drew a line down the middle of the wood so I could make sure my foam pieces were centred, and I used a little paper template to make sure all the angles were the same, and glued them down with craft glue. (My foam pieces measured approx 85 x 8mm or 3 3/8 x 5/16")
*After testing the print, I added a second layer of foam strips to the first one to be more spongey, it enabled me to get a better more uniform print than just one later of foam.*
Once I had my stamp made (and let dry overnight), I made a test by stamping on paper, but before lifting trace around the stamp and cut the print out. It was then glued to the top of the wood (just with a glue stick) so that when I used the stamp I could see exactly where the print was going to be. I covered it with tape for extra protection, as the stamp needed to be washed out after each use and I did this project in multiple stages.
Using block printing ink (add your fabric additive here if using) and a brayer roll out an even layer of ink, then use the brayer to roll the ink on your stamp. Do some test printing on scrap fabric until you work out the amount of ink you need and pressure to get a good print. I literally stood on the back of my stamp every time I printed, as that gave me a stronger print.
Make sure your surface is protected with drop sheets, and that also your work surface is smooth. I used a long piece of laminate wood that I had in the garage as my floor is textured and my table tops are all wonky (natural wood!).
Use some scrap paper to cover places like the curtain tabs at the top, that you do not want printed, then you can get your pattern all the way to the top. (Not like in this below photo! I fixed that up later on!)
I went all the way down one side of one curtain with the pattern, then I started the next line by placing the stamp down and then measuring with measuring tape where the edge of the stamp was, then marked with masking tape all the way down the length of the curtain so that my pattern didn't go off track. I did this for each new line of stamping.
I then continued on in stages, letting some dry so I could fold the curtain up and stand on the dry parts, and then continued. My curtains were quite wide so it may not be as big a job for you as it was for me!
Done! DIY home decor in the form of stamped chevron patterned curtains. I hope you liked this tutorial!
Today I am showing you a Marbled River Rocks garden craft! It's a fun & easy DIY, and a great way to get more colour into your garden.
You can watch my youtube video below for this craft, or you can keep reading below.
Start with some smooth river rocks spray painted white and some Easy Marble paints. Easy Marble paints are waterproof and lightfast; which make them perfect to use for a project that will be outdoors in the elements.
*For my fellow Aussies you can buy Easy Marble paints through Art House Direct
You take a container large enough to fit your rocks in, fill with water and drop 2-3 of your chosen colours into it. The paints will sit on the surface of the water.
Take a stick and swirl the paint around. It dries pretty quickly so I tried to work fast.
Take one of your river rocks and submerge it into the water. Before you pull the rock back out, swish any extra paint still floating on the surface of the water away from the rock so you don't get a double-up of colour on its way out. Also, make sure you're wearing gloves: the safety recommendations for the paint states that you should avoid skin contact.
Ta da! Once you've marbled one rock, use a scrap piece of cardboard to lift any remaining paint out from the water surface ready to marble another rock. Make as many rocks as you want!
Garden decorations! I love them, especially the projects that you can craft yourself. I love the satisfaction of walking around the garden and looking at the things you've grown and made for it.
I've used silicone baking moulds to make these concrete hearts. I've made plain concrete hearts before and then glued mosaic tiles onto them later on- that method is called the direct mosaic method- but here I'm using the indirect mosaic method.
The indirect method involves placing the tiles face-down into the moulds. I've pre cut some clear contact here to fit the heart shape moulds, and placed it sticky-side-up into the moulds. The tiles then have something to stick to to keep them in place for when you put concrete in.
You could also use paper and stick the tiles down using a glue stick if you wish.
It makes it tricky to see what colours you're using when you do the indirect method- but for this project it doesn't matter too much as the tiles are just placed randomly, and the end product gives a nice flat surface.
Now mix up some concrete. You could either use plain cement and sand and mix according to packet instructions, or just use some mortar mix which is premixed cement and sand. Place the moulds onto a board & use a spatula to fill the moulds with the concrete mix.
Always make sure to add as little water as you can to your mix- that will make it stronger. I sometimes add a fortifier to my concrete mixes to make the mix even stronger again.
Jiggle and tap the board to help release any air bubbles to the surface. I like to then let the hearts set for around 1/2 an hour then cover them in plastic for a few days to keep them wet, so they can cure and harden. Keeping them moist whilst curing can also help your finished product be stronger.
Remove from plastic and pop out of moulds and let dry.
Mine had a few air bubble holes in them which I filled with a pale grout, or you could make up a little more concrete mix and use that to patch up any holes.
This is a fun project that is easy enough for kids to do too. Mine certainly liked finding spots for them to go in the garden.
I started by finding a small bowl to use as a template for the lid and base of the box. Trace around and cut 2 from foam core board.
I then cut from thick card a length 2” wide, and a small strip 3/8” wide. Make sure these are long enough to fit 1/4” inside the circumference of your base and lid. Tape the wider one into a circle, then tape this circle to the base using masking tape. Do the same with the 3/8” piece, keeping in mind that it needs to sit in a smaller circumference than the base walls, also taking into account a bit of padding from the paper mache layers. My inner rim sits about 1/2” in from the lid.
Using newspaper strips and a mix of PVA glue watered down slightly with water (approx 1:1) cover all over the base and lid, making sure you overlap the paper strips as you go. I then do another layer in plain newsprint so I can see where I’ve already covered. Let dry.
Using air dry clay, roll out a small slab to a little under 1/4” thick. Cut a leaf shape out with a blade, and smooth the edges using a bit of water and your finger or a clay tool. Roll three small balls of equal size for the feet and gently press down with something flat to make the balls slightly flat on the top and bottom. Let dry.
Once the clay pieces are dry, use clear craft glue to glue the feet onto the base, and the leaf shape to the lid. Allow to dry.
Gesso the whole box and lid, inside and out, including the feet and handle.
Now it’s time to paint! I chose to draw some simple leaf shapes, then painted around them and added wiggles, stripes and dots. You can copy my designs or come up with your own! Adding gold paint around the rim is a fun touch too.
After decorating, I used water based gloss varnish everywhere except inside the box, and the inner rim of the lid, as my varnish can get a bit tacky when varnished pieces touch, as I discovered in my sketch book!
Now you have a gorgeous box to stash some special treasures!
Hands up who likes a before and after DIY furniture story!?
The finished table...
I am loathe to spend too much money on stuff inside the house. It seems like wasted money sometimes and if I can come up with a cheaper way of making things look good, well then, why not?
And as much as I love interior design shows, it all seems very wasteful to throw away things and get new stuff, just because we like a different look or style. I mean, some people in the world live in tin shanties and huts, and we need to rip out our old tiles because the colour is a bit daggy? We are very spoilt!
I am no saint and we do a lot of things in our house requiring new materials and funds, and I won't rule out ever removing tiles in my home, but I do love to think creatively when it comes to what I already have.
I had this sewing table that I bought for $4 from the op shop. It's nasty! I bought it quickly when we were setting up our house as I just needed a table. I was pretty proud of the cost :) Though recently I was looking into new ones and was going to throw this one to landfill, when I started wondering if I could save it.
(insert horror screaming soundtrack!)
Painting this thing would've looked terrible due to the worn away veneer revealing chipboard, so my solution was to cover it with oilcloth, which is essentially fabric covered in plastic, and nail it on with some upholstery tacks. I stretched the top piece on (after ironing on low) like a canvas, stretching it and tacking it from the middle one way then the other, and then working my way out to the edges of the table.
This is the desk upside down
I wrapped oilcloth around the drawers and tacked it on from behind. I glued the drawer back together with PVA, and spray painted the brown plastic handles. New handles probably would've looked nicer, but once again, it had handles, and this challenge was after all about not sending bits of it to landfill.
And now I have a cute little sewing desk! The bonus of which is anything you're sewing glides easily over the oilcloth and doesn't snag on that terrible rough chipboard that is now sneakily hidden.
Now if anyone could come and un-jam my sewing machine from me letting kids use it, I would be most grateful!!
I have a DIY concrete craft for you today: rhubarb concrete stepping stones.
I have by no means come up with this project. I've just seen it done so many times and wanted to make some for our backyard and I'm sharing our experience.
It's sumer here! I am so happy the weather is warming up which means we're heading outdoors much more as a family on our one acre block. There are always jobs to do (so many weeds- ugh!) and big projects to work on that Jimmy has started. We are currently working on some crazy paving using slate in a new fire pit area. We have an electric cement mixer here (which I dubbed Jimmy's thermomix) and I decided to steal some of the mix so the kids could be outside alongside us working making stepping stones.
We laid out some plastic sheeting on an outdoor table and the girls picked some large rhubarb leaves from the garden. (See Jimmy, rhubarb IS useful for more than just apple and rhubarb pie :D)
The leaves have lots of cool veiny texture which captures really well in the concrete.
We had some pretty tough wire that we used for reinforcing (which you can see in the bottom left hand corner above), which Jimmy cut with a grinder. You will need some sort of wire to reinforce the stepping stones, if you need to cut by hand just use the thickest wire you can manage to cut by hand.
The girls then took handfuls of the concrete mix and slapped them down onto the leaf. You keep adding them till you reach near the edges. I get them to wear kids gloves as you don't want skin to come into contact with concrete.
(For a nice strong concrete mix I like to use 1 part grey cement, 2 parts fine sand, and 1 one part coarse sand and a cement additive (optional) to packet instructions. You can also find suggested mixes on the sides of a bag of portland cement.)
We kept in from the edge of the leaf an inch or so, and shaped our leaves into heart shapes. Once we had one layer of concrete on the leaf, we placed our wire reinforcing in, then added another layer of concrete. Our stepping stones were around 1 1/2- 2" thick.
The girls tended to make their edges a little thin so I needed to remind them to build them up to make them the same thickness as the centre of the stepping stone.
Once shaped, we let set for 1/2- 1 hour then came back and covered with plastic. I kept them damp and covered for one week to let them cure for extra strength. (A minimum of 3 days would be sufficient.)
24 hours after they've been made you can peel the leaf off and neaten up any rough edges with a chisel or rasp.
The kids had fun peeling pieces of leaves back! :) They were really stuck in there, but they come out easily when they're all dry.
I love how they turned out and want to make lots for all around the garden! Jimmy thinks the rhubarb has earned it's keep (he thinks it pointless keeping something that requires a tonne of sugar to do anything with.)
I hope you enjoyed our DIY craft rhubarb concrete stepping stones experience, please drop a comment if there's anything you'd like me to craft out of concrete. It's such a versatile product, and it lasts a long time as art in the garden. Affordable, and no kiln needed!