Showing posts with label Home Decor. Show all posts

September 24, 2020

DIY Home Decor: Chevron Pattern Stamped Curtains

Hi creatives!

A DIY Home Decor craft project today, chevron pattern stamped curtains, that has literally taken me forever to get up here on the blog!


I had some old random curtains that I thought needed a bit of work. I sewed two different curtain sets I had here together because the window I have is large. 

To make these stamped curtains you will need:

- plain curtains 
- piece of wood plank off cut for the stamp back (mine measures 14 x 33cm or 5.5 x 13")
- craft foam 
- white block printing ink 
- fabric paint additive (optional)
- block printing brayer (roller)
- piece of glass
- craft glue 
- scrap fabric, scrap paper, spatula to scoop paint, rags for clean up, glue stick & sticky tape 

You'll need a large flat surface to print on- the floor is good or a table but make sure it's protected with drop sheets. My floorboards are textured so we found a long, wide piece of laminate wood in the garage that I put under the section I was printing on.

You may want to add a craft fabric paint additive to your paint, which will turn your creation washable. You will need to heat set this with an iron according to manufacturers instructions. I didn't do this as I didn't have enough left and was too lazy to go buy some and even lazier when it comes to washing curtains, so these will probably last me a long time! ;)

I started by doing a quick drawing of the pattern I wanted, and then cut out strips of craft foam to glue to my wooden block. I drew a line down the middle of the wood so I could make sure my foam pieces were centred, and I used a little paper template to make sure all the angles were the same, and glued them down with craft glue. (My foam pieces measured approx 85 x 8mm or 3 3/8 x 5/16")
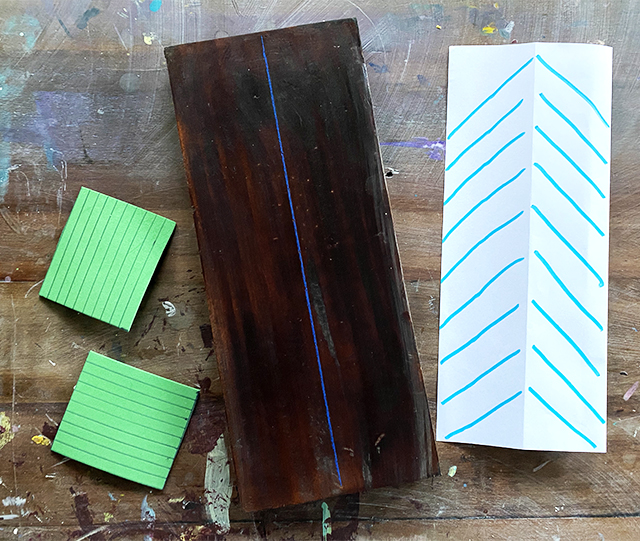

*After testing the print, I added a second layer of foam strips to the first one to be more spongey, it enabled me to get a better more uniform print than just one later of foam.*


Once I had my stamp made (and let dry overnight), I made a test by stamping on paper, but before lifting trace around the stamp and cut the print out. It was then glued to the top of the wood (just with a glue stick) so that when I used the stamp I could see exactly where the print was going to be. I covered it with tape for extra protection, as the stamp needed to be washed out after each use and I did this project in multiple stages.


Using block printing ink (add your fabric additive here if using) and a brayer roll out an even layer of ink, then use the brayer to roll the ink on your stamp. Do some test printing on scrap fabric until you work out the amount of ink you need and pressure to get a good print. I literally stood on the back of my stamp every time I printed, as that gave me a stronger print.


Make sure your surface is protected with drop sheets, and that also your work surface is smooth. I used a long piece of laminate wood that I had in the garage as my floor is textured and my table tops are all wonky (natural wood!). 

Use some scrap paper to cover places like the curtain tabs at the top, that you do not want printed, then you can get your pattern all the way to the top. (Not like in this below photo! I fixed that up later on!)


I went all the way down one side of one curtain with the pattern, then I started the next line by placing the stamp down and then measuring with measuring tape where the edge of the stamp was, then marked with masking tape all the way down the length of the curtain so that my pattern didn't go off track. I did this for each new line of stamping.


I then continued on in stages, letting some dry so I could fold the curtain up and stand on the dry parts, and then continued. My curtains were quite wide so it may not be as big a job for you as it was for me!


Done! DIY home decor in the form of stamped chevron patterned curtains. I hope you liked this tutorial!


Jules :)

December 09, 2019

DIY Craft: Rhubarb Concrete Stepping Stones

Hello!

I have a DIY concrete craft for you today: rhubarb concrete stepping stones.


I have by no means come up with this project. I've just seen it done so many times and wanted to make some for our backyard and I'm sharing our experience.

It's sumer here! I am so happy the weather is warming up which means we're heading outdoors much more as a family on our one acre block. There are always jobs to do (so many weeds- ugh!) and big projects to work on that Jimmy has started. We are currently working on some crazy paving using slate in a new fire pit area. We have an electric cement mixer here (which I dubbed Jimmy's thermomix) and I decided to steal some of the mix so the kids could be outside alongside us working making stepping stones.

We laid out some plastic sheeting on an outdoor table and the girls picked some large rhubarb leaves from the garden. (See Jimmy, rhubarb IS useful for more than just apple and rhubarb pie :D)

The leaves have lots of cool veiny texture which captures really well in the concrete.


We had some pretty tough wire that we used for reinforcing (which you can see in the bottom left hand corner above), which Jimmy cut with a grinder. You will need some sort of wire to reinforce the stepping stones, if you need to cut by hand just use the thickest wire you can manage to cut by hand.

The girls then took handfuls of the concrete mix and slapped them down onto the leaf. You keep adding them till you reach near the edges. I get them to wear kids gloves as you don't want skin to come into contact with concrete. 

(For a nice strong concrete mix I like to use 1 part grey cement, 2 parts fine sand, and 1 one part coarse sand and a cement additive (optional) to packet instructions. You can also find suggested mixes on the sides of a bag of portland cement.)


We kept in from the edge of the leaf an inch or so, and shaped our leaves into heart shapes. Once we had one layer of concrete on the leaf, we placed our wire reinforcing in, then added another layer of concrete. Our stepping stones were around 1 1/2- 2" thick. 


The girls tended to make their edges a little thin so I needed to remind them to build them up to make them the same thickness as the centre of the stepping stone.


Once shaped, we let set for 1/2- 1 hour then came back and covered with plastic. I kept them damp and covered for one week to let them cure for extra strength. (A minimum of 3 days would be sufficient.) 


24 hours after they've been made you can peel the leaf off and neaten up any rough edges with a chisel or rasp. 


The kids had fun peeling pieces of leaves back! :) They were really stuck in there, but they come out easily when they're all dry.


I love how they turned out and want to make lots for all around the garden! Jimmy thinks the rhubarb has earned it's keep (he thinks it pointless keeping something that requires a tonne of sugar to do anything with.)


I hope you enjoyed our DIY craft rhubarb concrete stepping stones experience, please drop a comment if there's anything you'd like me to craft out of concrete. It's such a versatile product, and it lasts a long time as art in the garden. Affordable, and no kiln needed! 

Enjoy,

Jules :)

September 11, 2019

DIY Craft: Faux Weaving


Hello Creatives!

I have a fun DIY craft today: faux weaving. 

I'm sorry I have not been around much! *cry* In all honestly I think I was suffering the winter blues and have had a long stretch with no inspiration. It happens to us all!

But something colourful is sure to cheer us up ;) And the sunshine that is out today. Sunshine helps!

This faux weaving was made by sewing wool, threads and trims onto a fabric panel. A look around your craft or fabric store will no doubt find you some interesting options & trims for creating your own faux weaving.

This wasn't a super quick project, but I'm liking the way it turned out and will feel quite happy with this hanging on my wall somewhere. You could squeeze it into a lazy weekend.

You will need:

- fabric for backing 19' wide x 20" high (48 x 51cm)
- various wools/ yarns/ threads/ trimmings/ pom poms etc
- Yarn needle with sharp end
- wooden skewer
- dowel rod (I used a piece of bamboo)


Sew hems 1/2" (1.5cm) down the sides of the fabric. Add a hem to the top making sure you leave enough space for the dowel to go through. I didn't hem the bottom as that was the selvage and will not fray.

Start decorating! Below here you can see I've added long running stitches and then loosely woven thick wool through them. 


Thick roving looks amazing. I stitched it down with vertical stitches as I went across. Once I did a row of this, I went back and did another row, mirroring the way I'd stitched the previous row.


I sewed down some random pom poms from my stash, and then made smaller little tufts by stitching loops in the fabric and then cutting them with scissors. A row of these would look good!


I also included lots of running stitches, sewing down multiple strands of wool, and sewing down thick wool but leaving little loops protruding randomly (above photo).


Lengths of wool looped at the top were added along bottom of the fabric. I found if I only looped over stitches it didn't look as neat, so I used a skewer to pull the loops tight and then sewed them to the bottom, then pulling the skewer out. I trimmed all this bottom hanging wool to a triangle shape.

Overall I'm pretty happy with the result! A fun project if a real weaving seems a bit intimidating for you!


March 18, 2019

DIY Painted Picture Frame

Hello Creatives!

A frame painting craft tutorial for you today. The end result is a textured frame that looks like it has some history... It has the look of having being painted a few times, but that is due to the texture that we will achieve through using paints and an acrylic gloss medium.


First, gather your supplies. Acrylic paints (Jo Sonja's acrylic paints are my pick), an acrylic gloss medium or varnish (Matisse Polymer Gloss Varnish is my fave), some fine sandpaper, and of course a frame and brushes and paint palette. Tissues will also come in handy.

When choosing a frame to paint, you want to grab something that has some different levels and surfaces. Some texture like flourishes or flowers would be even more interesting! I got this one from an op shop. 


There are no hard and fast rules when it comes to painting your frame. Choose whatever colours you like. You could find an image with colours you love and try to replicate them into your frame.

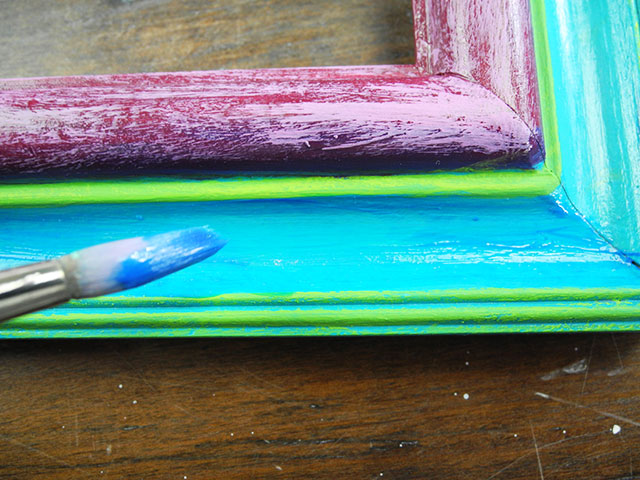
After removing the backing and glass and giving my frame a light sand, I chose to coat my frame in two colour to start with. Turquoise, and a deep pink.

I then coated the frame with the acrylic gloss.


Once that was dry I mixed up some lighter pink and brushed a bit off onto some paper to 'dry' off my brush a bit, and then dry-brushed it onto the deep pink colour. I highlighted some of the thinner details of the frame with some bright green.


Then I mixed some pthalo blue with some of the varnish and brushed it over the turquoise. Use a damp (just damp- not wet) tissue to rub parts of this paint mix off before it has dried, leaving some areas darker than others.


I then added some orange paint by painting it onto a scrap piece of paper and rubbing it over the frame. I also did the same with some bright pink which you can see in the end photos.


Next up, I mixed up a lighter turquoise paint with some gloss varnish and scrumbled and painted that in random places all over the frame. I decided I would like to bring out more of the green layer so added some more highlights in using some yellow paint. I also used the pthalo blue mixed with some gloss to go over the pink part of the frame, using my tissue to wipe parts of the paint back, leaving darker areas especially in the recessed areas of the frame.

mixing paint :)

You could go nuts by adding more colour by dry-brushing, or adding more coloured gloss mixes, or scrambling more paint over it using the scrap paper. 

Once you're happy with the look of your frame, give the whole thing one final coat of gloss varnish.


So you can see how layering up the paint and gloss quickly adds texture & and the look of lots of layers. You can really play around with the techniques described to come up with your own unique frame in your choice of colours. Let the frame dictate to you by it's unique shape how it needs to be painted, and most of all, have fun!


Jules :)

May 22, 2018

Crafting A Patterned Home - Book by Kristin Nicholas

I have been following Kristin Nicholas on her blog Getting Stitched on The Farm for a while now, and what I love about her is that she seems genuinely motivated out of the pure love of creating, to decorate her home and make things. She doesn't follow trends, she just has a love for pattern and colour that transcends the latest fashions. It's a true love affair, not just a fling!

photo by Rikki Snyder

This post contains affiliate links (see bottom of post for explanation).

So when I found out she had a new book out, Crafting A Patterned Home, published by Roost Books, I didn't hesitate, I didn't even read about it, I just jumped online and bought it!


I am, like Kristin, intoxicated by pattern and colour and love home decorating. Sometimes I walk into a minimalist space and find some peace and a breath of fresh air, but after a while, I grow bored. Pattern and colour excite me. So clearly I feel like I have lots in common with Kristin.

She has covered the walls in her home with hand-painted patterns, and objects such as lampshades and furniture are not safe... there's even a bath! In this book, she shares how she has done it.

Kristin talks about her previous book Crafting A Colorful Home in this video below, but you can get a sneak peek into her colourful life.


So even though I can appreciate a nice calm neutral home, when I saw Kristin's via this Houzz video I sat there absolutely enthralled. I just would love to sit in her loungeroom with a cuppa and cake and absorb all that pattern into my soul.

Kristin also includes some words of encouragement for the novice or the unsure (scared?) on how to get started.


She gives in-depth advice on how she creates her rooms. One of my favourite snippets of advice she gives is don't make your rooms too "matchy-matchy". I've always agreed with that line of thought; less matchy-matchy makes for a more personalised, interesting home. If all of your furniture is the same design, your rooms might end up looking too much like a furniture display store.

There's a lot of advice on colour, how to think about and design a room, and techniques and tools. There are projects for each space of the house, kitchen & dining, living room & library, bathroom and bedroom, and then outdoor spaces: pottery studio and garden shed, and in the orchard and under the pergola. And of course, if you don't have a pottery studio or pergola, you could make projects for your potting shed or outdoor deck for example.

Such as the one in the image below. I really want to do this with the chook pen window!


The book is bursting with colour, and as a creative person myself, I find it very motivating and I'm eager to try some of the projects in the book.

Thank you Kristin for a lovely book! It's going to slide out of my bookshelf and appear on my coffee table frequently!

Kristin's new book can be found here: Crafting A Patterned Home

Jules :)


*Affiliate Information: Affiliate links help me earn small commissions on products (at no extra cost to you), which helps support my love of blogging and sharing creative things. I only ever recommend or link to products that I'm genuinely into or would use.


May 08, 2018

Plaster Wall Hangings

Hello Creatives!

I've just had a mini Etsy shop update, where I have finished uploading some of the plaster art wall hangings I've recently made. I now have birds and hearts in the shop.


They are made from plaster (so suitable for indoors only) made from a silicone mould that I made myself. I cast them in plaster, then clean them up when set, and paint them in acrylic paints.


They are coated with a gloss acrylic sealer. Each one is one-of-a-kind and totally unique.


You can find them in my shop here!

Jules :)


LinkWithin

Related Posts Plugin for WordPress, Blogger...
01 09 10