Showing posts with label rug hooking. Show all posts

June 30, 2017

Creative Life Round Up

Here's a creative life round up, where I show a bunch of random shots from my crafty, arty & creative life.


Here I am testing out my new (but old) rug hooking tools. Which I guess are more like punch needles. They have quite a big opening in them so that I can use them with wool. I love the texture of hooked wool, and I love using wool with variations of colours within the ball.. it gives extra textural interest. And, this craft is fast! Which is great for an attention deficient crafter like me :) This effort is from one evening in front of the telly.


A bunting in progress upcycled from a thrifted wool scarf. I've also made some little upcycled tassels to use on this bunting too.


Hanging some of my collected lampshades up. I still have more to hang. I thought it might inspire my husband to get them hooked up electrically when they're all just hanging there from string and thumb tacks. Maybe!


Not being able to find an affordable jacket I like (in Australia) that is also warm I went and ordered a copy of Ottobre Magazine which has some jacket patterns in it. I'll get my Mum on the case when it arrives. She's an excellent sewer. I'm planning on getting her to make some lined jackets for me so that they will be nice and warm, plus how cute will patterned fabric for the lining be?


She also better get ready to sew some dresses for me. I have ordered this dress pattern designed by Dottie Angel. How awesome are they? Hoping to have some made up in time for spring when some warmer weather will be welcomed with open arms.


It's school holidays here now, and our first creative project saw us making some iced cookies. Check out how bad great they look! ;)

We eat more along the paleo/ healthy lines here, and I am yet to find an icing recipe that is easy to make AND use. I cannot master whipping coconut cream (I have ruined quite a few batches) and even this one I could not get to work. It was so clumpy to use but still tastes good I suppose. Looked nothing like it looked in the cookbook! This icing was made from cacao butter, coconut butter, honey and nut milk. 

The search continues! 

Other creative and crafty projects that we would like to do on the holidays include finishing some previously started projects and starting some plaster animals that will appear as a tutorial on my blog in the near future.


My final MATS illustration project has begun, which is a crazy eclectic mix of icons inspired by collections (I chose a quirky doll collection and beads). Right up my alley! I love that for the last project we get to go a little crazy. I will post the finished project here when done.


Miss 8 recently entered the Young Archie portrait prize. This is her mixed- media piece. I helped her with the planning but every step was completed entirely by her. I suggested a plan of attack: 

-draw your portrait in pencil on plain paper
-create some decorative papers to use for collage
-paint/ fill your background on your good paper (watercolour paper)
-glue your collage pieces onto the background
-transfer your portrait drawing onto the background using carbon transfer paper
-render the figure. She used acrylic paints and coloured pencils for the figure. 

The last step was to sign and varnish. 

The only thing I helped with was reassurance along the way, enlarging her drawing to transfer onto the watercolour paper, and some colour mixing tips when she got stuck. I believe having a plan & breaking it down into little steps removed some of the overwhelm of trying to create something good to enter into a competition. That kind of pressure is heavy!

That's it for now. 

If you've enjoyed these pics, I do the most sharing of my creative life in picture form on Instagram. Come join me there!

Yours creatively,

Jules :) 

June 14, 2017

Winter Time...


This is a Wintery post! Winter is here in Oz and while it's quite mild compared to other parts of the world (ie. it doesn't snow at our house), I'm still complaining and my feet hurt! But even though winter is my least favourite month I still try to be grateful of the wintery things we get to enjoy: nice warming meals, being cosy and warm rugged up inside, guilt- free movies, winter crafts, and the different textures and layering of clothes. Hello scarves.


As far as crafts go, rug hooking would have to be most at home during the winter months. My Mum recently found these rug hooking tools which belonged to my Great Grandmother. I've never used a proper rug hooking tool before, only a crochet hook (as in this post), but it will be fun to try and work out how to use the ones where you thread the needle up. I envisage watching many youtube videos showing just how to do it. They look like a much more efficient way of creating rug hooked projects. I wish I knew what my Great Grandmother made with them.


We set up our winter seasonal appreciation table yesterday (only a couple of weeks late). The kids felt Autumn wasn't quite done with anyway, as they pointed out Autumn leaves are still lying around. I don't usually buy anything new for the table; we seem to find enough things around the house. We go through craft supplies, decorations, jewellery, collections, toys, books; we have that book there which goes through the seasons so it's a great starter for our table. The kids are invited to add their own touches: found treasures, things from nature, or their own crafty or arty decorations.


Decorating the seasonal table is becoming a favourite tradition in our household. 

I made the wintery felt lady one night to add to the table. Miss 8 is working on one of her own, but it's not quite finished yet.


And while I'm on the subject of talking things textiles, this next photo is of a stamped fabric panel I have made that are destined for some new bags that I am having made. I can't wait to see them finished. 


If it's winter time where you are I hope you're surviving the cold. 

Might be time for a warm drink...

Jules :)


April 11, 2017

Upcycled Rug Hooking Project + Free Rug Hooking Pattern

Yay for finished projects!


I am notorious for starting craft projects and not finishing them. So I feel a little proud when I actually do finish something!

I discovered and fell in love with the craft known as rug hooking not too long ago, and decided to trial my own project.

I love colour and texture, and this craft combines those two loves. Not only do you get beautiful nuances of colour (especially when you use mottled or patterned fabric), but the texture of the little bumps of fabric is something I fell in love with when I first discovered this craft.


I made this project to be a wall hanging. I sewed a thin piece of dowel to the back near the top. I placed it a little bit down so I could hide the wall hook when hanging. The stiffness of the hooked rug means that the top of the rug stays up and doesn't sag.


I didn't have the correct tools or supplies, but I tend to make things up as I go, and overcome problems one at a time. I think any project is doable; you just need to break it all up into baby steps.

I used second hand scrap fabrics. I found my favourite fabric to use for this project was jersey fabric; the stuff t-shirts and leggings are usually made of. It's forgiving, it cuts up well, and it doesn't fray. It's made from our old clothes. They live on! Traditionally, wool is used for rug hooking projects, but you can really use whatever fabrics you like. Have a play and see what your favourite is. I found some fabrics really hard to pull through the hessian.

I have made a free rug hooking pattern for this project, so if you like it, you can make one of your own! Read on for the instructions.

-----------------------------------

I used some ordinary hessian from the fabric store; but if you can find some loose weave hessian I think that would be a lot easier to work with.

I used a crochet hook, but there are special rug hooks available that are dedicated for the task. Some people use latch hooks but for this small scale I couldn't get the hang of using one.

I cut my strips of fabric in about 1cm (3/8") widths. Experiment before starting with the width of strip you'd like to use, and what you feel comfortable hooking through the hessian that you have. Larger holes in your hessian will mean you can use wider strips and fill the space faster. I do however like the detail the small strips give in this project.

You don't have to use the colours I have used either. Use what you have. I chose to do a pale background with darker motifs, but you could switch that and do a dark background with lighter motifs. Keep in mind contrast; if colours are two similar next to each other, the elements of the design may not stand out.

Each square represents 2". Finished project measures 16 x 14 1/2". 
Leave 2" of hessian all around the edge of project. 

Enlarge the pattern by drawing up 2" squares on a big sheet of paper and drawing the shapes in. You can then place your hessian onto your drawn pattern and hold up to a window and mark the shapes with a black felt tip pen. (You won't see any pen marks on the finished piece.) Draw in the edge lines too.

Leave two inches of hessian all around the edge of your project, and zig zag around them with a sewing machine to prevent fraying.

Decide on your colours and cut some strips. I just cut as I needed them.

Here's my basic instructions on how to rug hook.


You stick your hook into the hessian and pull up loops. You can wriggle your hook around a bit when it's in the hessian to make the hole bigger for extra ease when pulling fabric strip through. You want to pull your loops up to a similar height (1) . In this project mine poke up from the hessian about 1/4". You start and end a strip with the ends poking up the top, not left dangling underneath (2). The fabric underneath is laying flat against the hessian, not in loops (3). 


You want to kid of twist your hook in the direction of that first arrow so you are pulling slack from the working end of the fabric strip (1). If you just pull straight up you will be pulling from both sides and you may pull out or alter the height your previous stitch (2). Once you start hooking you will get the hang of this. If you make a loop too big you can just pull the working end a little so it matches the height of the previous stitches.

If you make any mistakes you can just pull them out.

What the hooked rug looks like underneath. 

You don't need to pull loops through every hole in the hessian, otherwise they will be too tightly placed together. You want them close enough so that the hessian is covered, but not packed too tightly. My stitches are approx 5 to an inch for this project. Again, it will depend on the thickness of your fabric, the width of your strips, and the size of the weave in your hessian.

I worked in patches or flowing lines. It reminds me of those drawings you did in school where you traced your hand and then continued to draw lines around and around until all the lines fill the page :)

I didn't use a frame or anything, but yours may turn out less wonky if you use something to hold it taught while you work. (I think there's charm in wonky work!)

Once the project is finished, fold under the edges and stitch in place with a needle and thread. Sew your dowel to the back and attach a hanger to the dowel.

I attached a hanging hook to the dowel


Done! Yay! Superstar!

If you have any trouble or questions please let me know and I can clarify steps or add in extra tips.


I hung it up in our upstairs living area, above an artwork by Miss S. 

I hope you enjoyed my rug hooking adventure.

Jules :)

March 13, 2017

Bits n Pieces ~ What I'm Working on ~ Ramblings

Hello!

Just thought I'd check in and do a bit of a round up if you will of what's happening in my illustration/ art/ creative world.

Yesterday saw me get a bit overwhelmed with all that I have to do (the Mr has been away for work a lot and I am on a healing diet which requires lots of cooking; add that to just looking after kids, housework, illustration work, a market coming up, plus all the other things I want to do...)

We can't do it all, can we? I have around 7000  photos on my computer that I haven't done anything with. And when I get in these states of overwhelm I think about ALL the stuff I want to get done. The weeding, gardening, the mending pile... Why!? Why do I think of it all at the same time!? And why if I take a break (such as going out for coffee with friends) then my mental state comes out of that overwhelm? I think in reality it's more about my state of mind than the circumstances, so I'm trying to be aware of this and be more in control of my mental state. Sometimes when we hit overwhelm it may mean we just need to mix things up and do something different or take a break. Who else gets overwhelmed like me?

My couch upstairs, a.k.a. the messy craft shrine 

Something that does make me feel good though, is just picking up a project and making some progress with it. Then all the happiness of creating comes back and I feel motivation to create again regardless of the fact I have like a zillion unfinished projects lying all over the house :) It doesn't really matter, does it, in the big scheme of things? 

I have nearly finished that small rug hooking project, so that's a win!


Something I did finish recently is this modern acrylic painting. It's on a small 8x8" canvas and I am loving the contrast and colour palette in this original painting. I listed it in the shop here.


I also got around to listing this one too. It's a small acrylic painting on a handmade plaster panel. I really do love the texture of painted plaster. Also now in the shop.


I'm also working on the third component of the MATS A illustration course I am taking. It's the Children's Book Illustration component and I'm very happy to get started. I will post about my second round soon. But for now I am playing around with some cat character designs. Very fun.

In the home decorating arena I am researching and gathering inspiration on what on earth to do with our stairs. (Pinterest is a godsend!) We have lived in this house for 6+ years and our stairs are unfinished. They are the first thing you see when you open our front door! They are on our list of things to complete for our latest ongoing home project. The Mr and I are constantly arguing about what to do for the stairs. (!) I'm thinking a runner but every time I go to research runners the only good ones I find are all from shops overseas. Waaaahh! Talk about first world problems. But if someone knows of where I can find a moderny-boho-colourful rug runner here in Oz I'd be very grateful. But in the meantime I will shed tears again over not having Anthropologie here in Australia. Yes, totally first world problems. I am aware.


Maybe I should paint the stairs...!?

This week I am working on some illustrations for a children's dictionary, and also finalising my next two tutorials which are coming up soon. Easter themed!

But today is a public holiday so I will float around the house, maybe create a bit here and there, eat, cook, drink numerous cups of tea, and watch the kids play in the sun. Getting prepped and reenergised for another busy week ahead...

See you soon.

Jules :)


September 20, 2016

Overdue Room Revamp

I'm drumming up motivation to finish decorating some more of our house. I have finally inspired the husband to get on board helping me inside the house! He is usually just focussed on outside projects :)
My chosen main colour for upstairs Dulux Linseed.

Upstairs is currently yellow! It is an open plan type area consisting of our kitchen, dining and lounge. I am going with a more neutral colour, it looks light here but it's a mid- tone grey on the warmer side of the greys. I nearly went lighter but that made me nervous. It's funny how I feel nervous with lighter standard colours, but I feel completely at home painting my walls dark colours. I'm actually still a little nervous about grey! I would actually prefer a colour but have met my husband half-way with the decision, with some small walls to be painted colourful instead. Plus, some wallpaper has been ordered!
Our chosen Piet Hein Eek wallpaper

I also have some painted lights going in. This one I have just finished, it's not actually going in the room we're currently working on, but it's a finished creative project just the same and I will have it installed at the same time as the other lights.
It used to be black. I painted the main part with terracotta colour spray paint, then threw some builders sand onto it whilst it was still wet. I then got some oil paints that I thinned down (raw umber and a bit of yellow from memory) and dabbed it on here and there. The beads were removed and spray painted a metallic blue, which I had to undercoat in a lighter colour first.

Here's a particularly grainy picture showing some of the yellow being covered up. And kids keep pulling pom poms off my light shade! 
I can't wait to get my wallpaper delivered and finish the job off. We have a list of about 20 things we want to complete for upstairs. 

And when I'm tired at the end of the day I will keep working away at this rug hooking project I've been working on. I'm sure it will look good somewhere upstairs against my new grey walls.
I'm really enjoying working on the revamp. I'll show some progress shots as we go along.

Jules :)

August 18, 2016

Rug Hooking- New Obsession

Do you have Craft Attention Deficit Disorder?

I do! And there is no cure!

My latest project? Rug hooking.

Any time I see a hooked rug creation, it stops me in my tracks. I love the bumpy texture and the way all the colours are intermingling. It's that love I have for colourful texture that draws me in. It kind of reminds me of impressionist paintings.

Rag Rug by Kaffe Fassett

The hooked rug method is all about pulling up loops of fabric, felt or wool through some backing fabric which creates a neater appearance than a latch hooked surface. Latch hooking is so 70's. (Though I'm sure someone could prove me wrong there and show me a great version of a creation that's been latch hooked.)

My first venture into rug hooking

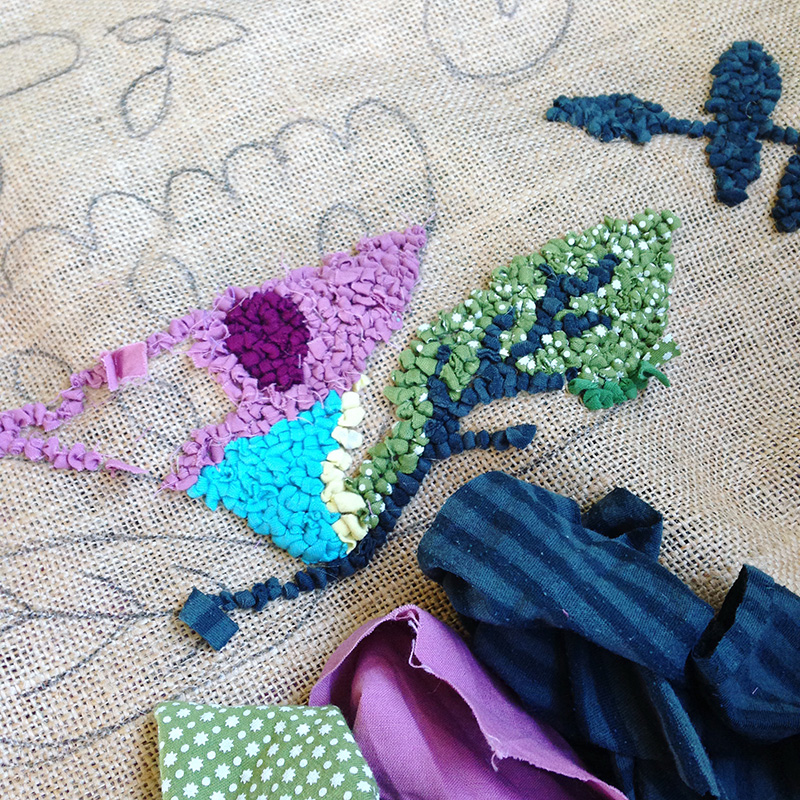
I first read about the method in one of Kaffe Fassett's books (One that I talked about here). I like that there weren't many rules in his book. I always thought you had to source pure wool fabric, felt it and maybe even dye it in different shades and then cut into uniform strips. When he said to use any type of fabric, this was motivation enough for me to try it out. I'm using cotton, old jersey fabric from worn out clothes, and anything else I happen to find in my fabric stash.

Some people stretch their work over a frame but I'm once again choosing the lazy crafters method and just hooking it as is. I am using hessian (I think it's called burlap in the US?) as the backing, and a crochet hook as I don't have a proper rug hooking tool. 

The going is a little slow. Especially slow compared to some videos I've seen of people doing this, and perhaps it's because I don't have the right tool, or that I just haven't got my technique down pat yet. I would like to get a proper tool as maybe it would make the task easier. Although to me they look like crochet hooks inset into a wooden handle. Then again, maybe my hessian is too- tightly woven.

Photo of hooked owls from Mary Art Spirit (I have a bit of an obsession with her work!)

A close up of the method of rug hooking. Image credit

Reminds me of the texture in this rug found at Temple & Webster

So I'll let you know how I go! In the meantime, if you want to check it out how to do it too there are lots of videos on you-tube showing how. Maybe I can share my pattern here when I'm done if it looks any good. I know it piqued a few people's interest when I posted it on instagram. I do think it's a good project to sit down to on a weeknight or lazy Sunday, and it's also a good way to upcycle any old clothes.

What do you think? Have you tried out this craft?

Jules :)

LinkWithin

Related Posts Plugin for WordPress, Blogger...
01 09 10