Showing posts with label Easter Crafts. Show all posts

April 20, 2019

Painted Easter Eggs

Hello Creatives!

Painted Easter Eggs for you today.

I found some blank craft eggs in a shop, I think they are plastic but they have a surface that felt like paper which made them perfect for painting on. They came with little plastic loops in the top for hanging them up. I popped them out for the purposes of taking photos, but have since put them back in and they are hanging on a little branch on the dining table. (Sorry, no photos of that!)


I went with an animal theme, except for one sneaky egg which wanted only flowers on it :)


I like the back of the octopus egg, I think, more than the front! I can see a whole set of painted Easter eggs for next year just in swirly designs.


They're all painted with acrylic paints and finished with acrylic gloss. 


Thanks for looking and Happy Easter!

Jules :)

April 16, 2017

Happy Easter! Creativity in The Madden Household

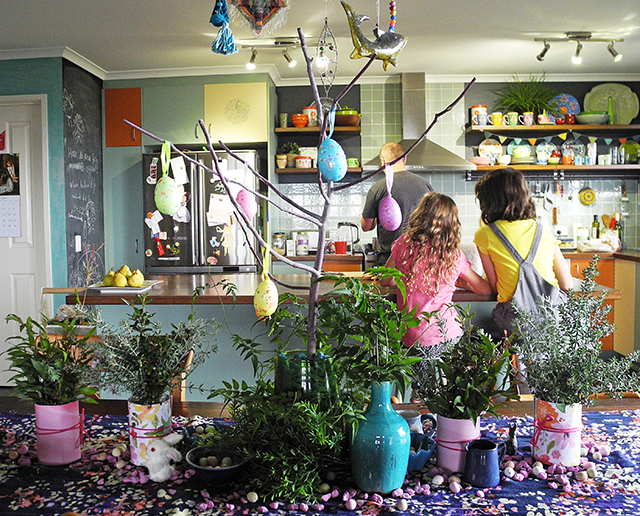
This Easter we decided to get all creative with a craft project that saw us painting wooden eggs, baking bunny cookies and making an Easter themed table centrepiece. 


Here are our gluten, dairy, grain & refined sugar free (but delicious) bunny cookies. Our bunny cookie cutter was from the gorgeous toy shop Epoche, and we used this recipe to make the bunnies.


I didn't spend more than $10 putting this centrepiece together. The table "runner" is actually a scarf. The greenery is from the garden in jars with scrap book paper and tied around with pink string.


I asked Miss S for a few bunnies from her collection, and used some decorative ceramic pieces and other bits and pieces from my collection.


There are some little pink decorative pebbles that I already had in my craft supply stash. And the pom pom seemed to ask to be put in the mix :)


The decorative hanging eggs were from the dollar store. I love mixing in cheap things, with nicer pieces.


Happy family memories in the making...


Here is the Easter craft component: wooden eggs that we painted. We bought the plain wooden eggs from Winterwood Toys (which is a felt & craft supply store). They took us 3-4 painting sessions to complete. When we'd finished painting them we added some glue and glitter. We love using glitter in our craft projects!


The painted eggs looked right at home when they joined our table centrepiece.


Then, because I had used some candy covered chocolate eggs in the display, it was just a little too tempting for the kids! (I didn't tell them, as I was hoping they wouldn't realise. These kids can sniff out sugar a mile away!)


Lots of bunnies to play with...


Which egg to eat? So hard to choose!


In the afternoon the sun started streaming through the windows & the table display putting beautiful light through the decorations so I just had to take some more photos. Can you spot the tiny opportunistic spider on it's web!? Our display is living!


So that wraps up our creative Easter.

I hope you have a lovely, creative & safe Easter with friends & family.

Jules :)

Thanks to Arhaus for suggesting I come up with a creative table setting. I loved the idea so I did it!

April 02, 2017

Creative Life Round Up

Thought I'd do another one of those rambling/ round up/ catch up posts as I've been working on lots of bits n pieces here, there and everywhere. (Which is very similar to how I live my while life really; short attention span, quickly going from one thing to the next, leaving large messes behind me as I go...!)

I made a new craft tutorial for making your own bendable Easter Bunny Ears, and is now up on Alisa Burke's blog

easter craft, bunny ears, cute craft

DIY
Miss S and her bunny ears- my kids usually get to keep my finished crafts from the tutorials I make!

One of my passions is creative interiors, and I'm always looking for ways to spruce up my home. (I keep thinking the prettier it is, perhaps it will hide the mess? No?) I had some beautiful flower linen fabric for ages that I meant to make into cushions. But because my Mum is such an ace sewer, I hand balled the job over her. How good are Mums that sew!?

My new cushions and also some extra vintage fabric cushions I found recently whilst op shopping.

I used to make and sell a lot of bags back in my 20's. Thought I'd get into making some more. This is one bag I made not too long ago. It's from a Made by Rae pattern. (All her sewing patterns are so ace.) So, I have designed a new front panel, which I am not showing here yet, but I did go fabric shopping and bought all those lovely fabrics below the bag photo which will become new bags very soon. Yummy! I love fabric shopping! (Thanks again in advance, Mum.)


Some of the selected fabrics...

A paint palette shot from this week in the studio.

I've been busy working on some paintings, adding hangers, and visiting the local framers for a group exhibition coming soon in a town near me in The Station Gallery.

Some of the 10 works I've chosen to exhibit

And the school holidays have officially started! I've been busy trying to get lots of work done so I can relax a bit with my kiddies over the break. Hoping to do lots of this kind of thing:


Because, downtime and reflection are just as important a part of the creative process, I think.

Hope you've been creatively busy too, I'll be back soon with more creativity...

Jules :)


March 25, 2017

DIY Craft: Stamped Easter Bunny Gift Tags

Easter Craft Project

I have an easy craft project to do today for Easter coming up. It's an Easter Bunny stamping craft project. You could use these tags to spruce up some little chocolate gift bags. 

This one uses basic materials and is easy enough for the kids to do/ or help out, depending on age of course. 

You will need:

- Paper
- Foam sheet (just the kind you use for kids crafts)
- Ink pad (we used black)
- Acrylic paints 
- Watercolour paper (nothing fancy; you may use student quality- just make sure it's smooth)
- Glitter (yay!)
- Stamp block*

Other things you'll need: Pen, pencil, scissors, hole puncher, double sided tape

Start by working out the size of your tags.  I made mine 2 x 3 1/2" (5 x 8.5cm). 

Draw the tag size onto some paper then draw a simple bunny head. Start with a circle for the face, then add your two ears and facial features. You may want to draw it a few times and then pick your favourite. Don't worry about perfection here. Cuteness comes in the naive details :)


Once you're happy with your bunny face, place the image over the foam & draw around the edges, That will produce a bit of a ghost line on the foam so you know where to cut out. Alternatively just hold the paper on the foam and cut around the shape. Press into the foam with your pen over the bunny facial features to imprint the details. 

Then remove thew paper template and go over the facial details again pressing down to indent the lines a bit more.


I attached my bunny face onto the stamp block using some double sided tape. 

*I had a see-through stamp block that I found in a cheap craft store, you may also use a block of wood or something else similar that will do the same job.

Then, stamp away! Take your stamp ink pad and make some test prints.


Now you can decorate your paper.

I added a watercolour effect to my paper. I use a smooth surfaced paper, so that when I stamp my image it is not affected by the paper texture. I simply water down acrylics and paint with them like watercolours.


Keep adding more paint until you're happy with how it looks.


Once dry you can cut out to your predetermined size.


Stamp your bunny faces onto your tags, leaving space at the top for a hole to be punched. I love the look of stamping, the slight variations and rustic-ness of the printed images pleases me :)


I then mixed up some warm red with a bit of white and a touch of cool blue. I made the paint thick and blobby so that I could paint a spot and glitter would stick to it when sprinkled over.


So, sprinkle your glitter and shake off excess. Snip your top two corners off and punch a hole in the top. 


And you're done! Wait to dry then use to decorate some Easter gifts. 


Variation: If you'd like to simplify the project for younger kids or if you're a teacher doing this with a class, you could use some heavyweight scrapbook card instead of painting your own tags. Then just proceed with the stamping and adding some paint & glitter.

Enjoy!

Jules :)


LinkWithin

Related Posts Plugin for WordPress, Blogger...
01 09 10