February 05, 2018

New Art Print: Just be You

I have a new art print available in the shop.


This painting was created as part of the MATS illustration course I did. You can read about the process and see progress shots here.

A bit of wall decor... Example of "Just be You" framed 8 x 8"

It's such a simple yet inspirational and empowering quote. So many of us need a reminder that we don't need to try to be something else than our own unique, quirky and weird selves.

Just be you! Because everyone else is taken... :)

So from one shy person who at times can be riddled with insecurities, I'm finding this artwork is just as good a reminder to myself. 

I really enjoy my own company but am still learning how to completely own myself and be ok with who I am out in the wide world. I'm getting there slowly, the more I age :) 

I hope you like it!

You can find two sizes of this print here in the shop.

Jules :)

February 04, 2018

Out & About: Sand Sculpting Frankston 2017

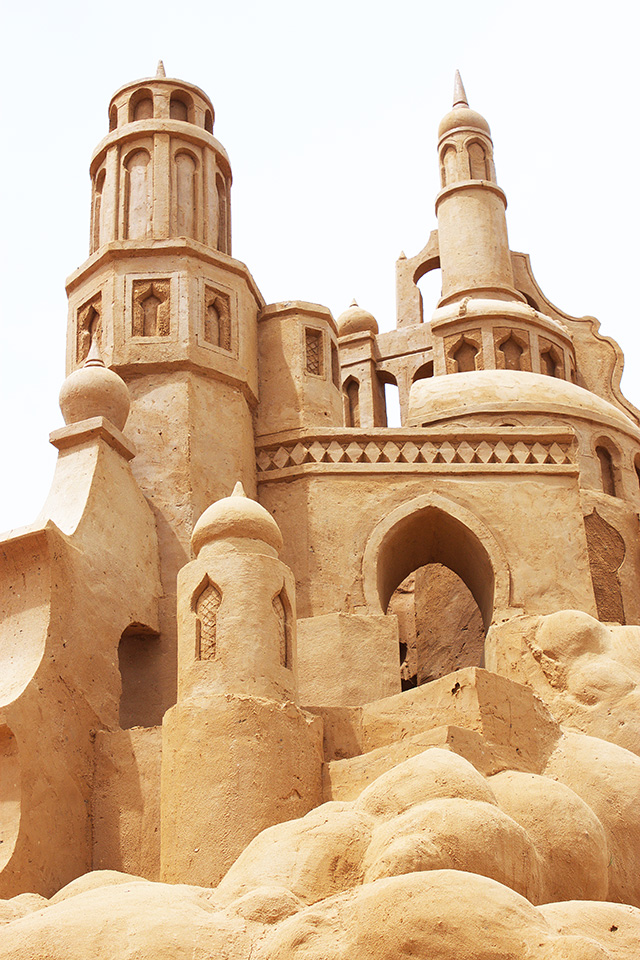
A few weeks ago we made our way out to see the latest Sand Sculpting Australia's event at Frankston, Victoria, this year's theme being Aladdin.


3500 tonnes of sand was sculpted into characters and scenes with mind-blowing detail. The work that's gone into each sculpture is amazing. I was interested to learn that there are no additives added to the sand, they use brickies sand which holds it's shape, and they start with big blocks which the sculptors carve into. It took 20 sculptors 5000 hours over 30 days to create them. They are then sprayed with a bio-degradable finish to help them last.


Some of the sculptures were a tiny bit weather damaged, but that did not impact the exhibition at all. In fact, I'm amazed that they stand up to the weather for so long.


We all had favourites. This bird was one of mine. I think it's the combination of textures and the organic shapes and chunkiness of it that I liked.


The centerpiece was this huge castle. It was huge and pretty fantastic. I think I took a few too many photos of it :)


This event certainly inspires the kids to get into a bit of sand castle building afterwards! We actually had a trailer load of sand at home for some work that Jim is doing, and so the kids got in there later on and started carving out the sand :) it always makes me happy seeing them inspired.

After the sand castles we went for a bit of a paddle at the nearby beach. (Well, the kids did. Too cold for me!)


You can check out more information about the Aladin sand castles at Sand Sculpting Australia. The exhibition runs until 25th April 2018.

Jules :)


January 19, 2018

A Late Christmas Post & Update

Helloooo!

I have been very quiet again here, sorry! I thought I'd do a belated Christmas post, showing the decoration I made for Christmas 2017, which is now last year.

Gluten free macadamia & current shortbreads that were a hit! Seriously, healthy food is yummy!

We decided to stay home this year instead of driving here there and everywhere to see family. But, I wasn't getting out of any work as people came to us instead. I kind of forgot about that part! Lucky I have a great Mum who came and helped me with everything, and family members also all brought something to share, which lightened the workload.

For my Christmas display above the table, I placed a plank of wood on top of my hanging Morrocan style light. I used some greenery from the garden and tied it all on securely with string.


I hung felt stars that were previously made for a craft tutorial I did recently. I draped second-hand necklaces around the branches, then twisted some little battery operated lights around it all. 


I had a bag of pearl beads and I set the kids to work threading them and hung them up too. Putting the kids to work makes jobs like these easier, and they love helping me with projects like this. They enjoyed choosing the different colour combinations of the beads.


Christmas was fun and pretty relaxing. Except for the trampoline that a certain delivery company couldn't deliver to us in time, but it all worked out ok, the kids were very happy with what they received Christmas morning, and the trampoline was basically a replacement for the old rusty one we already had in the backyard. We have since received our new trampoline and the kids are very happy!

We had a second round of people over for New Years, and I made my husband fill two buckets with concrete and branches for me to string lights between. I will have to take a photo of that to share.


I have been a little absent lately as our new puppy got very, very sick. I have been dealing with vets and doing lots of research and have a whole protocol of things I am doing for him. We nearly lost him. Twice. He seems to be on the improve now though, so fingers crossed we are through the worst of it and that he will be ok! Here he is enjoying the swing at the local park :) He is a dag :) He had immune mediated polyarthritis, meningitis, and signs pointing to immune mediated thrombocytopenia where basically your platelets are attacked and you start bleeding internally. The arthritis was an immune attack on his own body. He is not 100% as he went through a lot and is now on medication. We suspect his puppy vaccinations were the cause or trigger. It's been an awful experience and a very expensive one too. 


And see my nails in the above photo? We have really got into nail painting these school holidays! Here are some bunny nails I did for my eldest, courtesy of Pinterest searching!

A project I have begun work on is a chicken coop reno!! Here's a sign I have painted for above the front door. We need more nesting boxes and perches so I am going to get Jim to do those, but I have a few plans for doing up the girls' space with a touch of colour. After all, they do need some prettiness to lay their eggs, right!?


Hope you've enjoyed my update. Happy New Year to you all and I'm looking forward to 2018 being a super creative year!

Jules :)

December 20, 2017

Creative Life Round Up

Hi there! My creative-life-round-up posts are just a round up of random creativity that's happening in my world at the moment. 


Christmas is a-coming! I have just finished this little elf for a special little niece in my life. Her mama has extremely good taste and loves all the same fabrics and colours I do, so basically I made this with her in mind! I got the pattern from Wee Wonderfuls

I chose to make the elf on the left, and I used real wool felt for the felt components. Real wool felt is SO much better than the acrylic stuff.

Aren't they just so cute!? I really would like to get this animal pattern and make each of these cute little animals too! They are smoochalicious!! 


Food. Food is always happening here, and no, it's not always this pretty! This was for the girls' birthdays not too long ago. Right now I'm starting my Christmas cooking. My first project was shortbread cookies which I just burned. *Cry*


The husband-man and I recently took a trip... BY OURSELVES... no kids!!! Into Melbs. (Melbourne.) We saw a show, had some dinner, strolled around the streets, saw a couple of celebs, and basically felt like teenagers again. We went on our first dates as youngsters together into the city, so it felt strange to be walking around there for fun again together post having children. We don't often do things without the kids, but I could really get used to more of these outings! I like some of the creative laneways that are covered in art. Should've taken more photos!


Here's a landscape painting I started that is really not my style but was compelled to do it from a photo I took when out walking the dog. I have to say it's quite refreshing trying out a different style and I'm happy with where this small painting is heading. 


And another painting I've started! I had an image in my head of a pegasus painting, it's not turning out quite how I imagined, but I'm happy with it all the same. Maybe I'll have to keep painting pegasus paintings until I get it right!? A whole series perhaps??


And here's a terrarium I made for a good friend!

Hope you enjoyed my latest creative life round up. 

Jules :)

December 14, 2017

DIY Christmas Craft: Fabric & Glitter Christmas Tree Decoration

Time for a DIY Christmas craft!


We are staying home this year for Christmas, and I'm excited not to have to get up and rush all around trying to fit in all the visits to various family members. That may be a tad selfish, but it's been a busy year and just want to see out the end of the year moseying around my home.

Lots of sucky things happened this year, nothing terrible, but I got to the point of being over the constant flow of problems. I'm really hoping 2018 will be the opposite of this year! I'm not going to dwell on the negatives and list them all here, I must try and think positive thoughts and perhaps that will help bring some more positive experiences into my life :)

I did get to the point of everything compounding and I dropped my bundle! My blog slowed down, and I've hardly been able to seem to find the time to be creative. It's slowly coming back and I really need to make art and creativity a priority. I have been creating here and there but I haven't been sharing a whole heap here or on social media. Not deliberately, just because of shifting priorities, and my time was taken up elsewhere. 

Consequently, I've been thinking about where I want to be next year, and what form I want my creative business to head towards. I'm planning on doing a fair bit of work around this house decorating, so I can blog about my progress and share other things I'm getting up to creatively. I'll add new products to the shop when they eventuate. But I'm going to slow things down a tad and just share when I can. That may mean a lot if I'm going through a phase where I seem to be able to fit it all in, and others times it may slow down a bit, depending on life. 

So I'm going to forget all the negative stuff that happened this year and enjoy the heck out of this Christmas!! A lot of ace stuff has happened too! So I am going to focus on those things. 

Enough of that, let's get into some craft! I created this tutorial for Alisa Burke's wonderful blog, but I like to share them here for my readers too :)

I just love super colourful decorations. So I delved into my fabric scrap collection (I can never throw out small pretty pieces of fabric- the always have a use!) and came up with these christmas tree decorations. I then accentuated them with glitter, because it’s the perfect time of the year for an excuse to use the sparkly stuff!

You’ll need:

Stiff card
PVA glue
Assorted fabric scraps
Silver glitter
Toothpick
Masking tape
Baking paper or sheet of plastic
Tiny amount of stuffing

First, we’ll make the cone out of the card.

Start by making a centre point (top anchor point) at the top of your card and measure 27cm (10.5”) straight down (bottom middle point), then mark again. Then, using your top anchor point, swivel your ruler to the sides and mark with dots using the same length. Join the dots up and you will have created a curve for the bottom of the cone. From the centre bottom point, measure an equal distance straight out to both edges. I chose 16cm (6”). Draw lines from your top anchor point down to those side marks for the outline of the cone shape, adding a flap to the side that will be used to glue the cone together. Cut out.


You can see using this method of creating a cone that you could make play around with different sizes.

Curl the card around so the flap lines up to the other side, glue, and use masking tape to hold in place.


Make a template out of some card for the scollops using the diagram as a guide. Place onto the wrong side of the fabric, outline and cut out. You can keep placing the template side by side to get longer lengths. As you go, check by wrapping your fabric strips around the cone to make sure you have enough lengths.


Lay fabric strips out over baking paper or plastic. Mix some PVA glue and water with a ratio of 1:1. Paint it on to the back and front of the fabric strips and leave to dry.


Once they are dry and stiffened, use your fingers to curl up the edges of the fabric.


Start by gluing a strip of fabric along the bottom of the cone before you start with your scolloped pieces.


Run glue along the top edges of the scolloped fabric strips and start wrapping them around the cone. Make sure when you go up a layer that the cone is covered by the fabric so that you can’t see the card underneath. Continue until the cone is completely covered.


Using 2 small scraps of fabric, place wrong sides together and lightly draw a star shape. Sew all around the star leaving the bottom two edges open. Lightly fill the star with some stuffing, and then sew the two remaining edges closed, leaving a small gap in the bottom middle. Trim around the star close to the stitching. Pop some glue onto the end of a tooth pick and insert it into the base of the star, and then place some more glue onto the other end of the toothpick and poke it into the top of the tree. (If there’s no hole there use your scissors to snip off the very tip of the cone so that there is.)


Using a brush, paint PVA glue onto the very edges of the scolloped fabric and the edges of the star and sprinkle silver glitter all over, tapping off the excess.


Then enjoy your colourful christmas tree decoration! I’d love to see yours if you make one!


Jules :)

November 27, 2017

Koby Cumulus Children's Picture Book released!

How exciting, my latest Children's Picture Book has been released!

Koby Cumulus, written by Melissa Doughty and illustrated by me :)

It's called Koby Cumulus and I've been blogging about the process (3rd and last blog post still due, but you can read blog posts one and two here and here respectively.)

The book turned out beautifully, and we were all very happy with the printing and the papers used. What a nerve racking experience to see the book you've been working on for the last 6 months appear; knowing that it's too late to change anything if need be!


The endpapers

Koby Cumulus is a 6 year old cloud who loves life... until he hears people grumbling about the weather.


It's a beautiful story about realising your own self worth in the face of negativity and rejection. Koby also has a mentor, who is his granny, so it'd be a lovely book for a grandparent to read to their grandchild! 


I have favourite parts of the book that I have illustrated, I like how this horse turned out and the ripples in the water. It reminds me of a book from my past that I can't quite put my finger on... 


And my favourite page is where Koby is sprinkling a light shower over some red roofed homes.


Lots of kids like the page with the rainbow!

Melissa has done a beautiful job of creating a story with a message of self confidence that can be used as a tool to help children become more resilient.


I'm so happy to finally share this with you all!

If you'd like to learn more about Koby Cumulus or purchase a copy head over to Published Panda where they have low shipping for the rest of this year.

Jules :)

LinkWithin

Related Posts Plugin for WordPress, Blogger...
01 09 10