July 18, 2017

Garden Art: Decorating Plant Pots

This blog post is about a creative garden art project I did with the kids. Decorating plant pots.

Or as we called it whilst we were doing it: cheats mosaic!

We've worked on a few crafty projects these just-gone school holidays. Not as many as I would have liked, but then again do we ever do all the things we put on our to- do lists!?


Decorating, or "mosaicking" these plant pots was a fun activity to do with the kids; it felt like a craft project, but involved no glue or paint, and was easy, and the kids had a ball!

We called it "cheats mosaic" as we were "mosaicking" the surface of the plant pots, but just arranging our decorative tiles, glass pebbles and beads on top of the potting mix. The decorations act as a mulch too, so this is a bonus :)

This would be a fun project to do with young kids, as it's so easy and the little ones would be quite pleased with their results.

We gathered our supplies which included mosaic tiles, coloured garden pebbles & rocks, glass pebbles and some beads. Buttons would also work! I get my supplies from all over but try specialised mosaic suppliers, hardware stores or tile shops for tiles, garden shops for decorative pebbles & rocks, and $2 stores, and crafty stores for various other bits n bobs.

The mosaic supplies are so fun to play with & organise

Once we had all our supplies all set out, we simply went to work "mosaicking" our pots. 


Miss 8 went for a spiral design, whereas Miss 6 went for a hodge podge! I thought she was going really well and should've stopped earlier, but adding more and more beads was just too fun and tempting. I did not impose my design opinions on her though; I let her be free with her creativity!
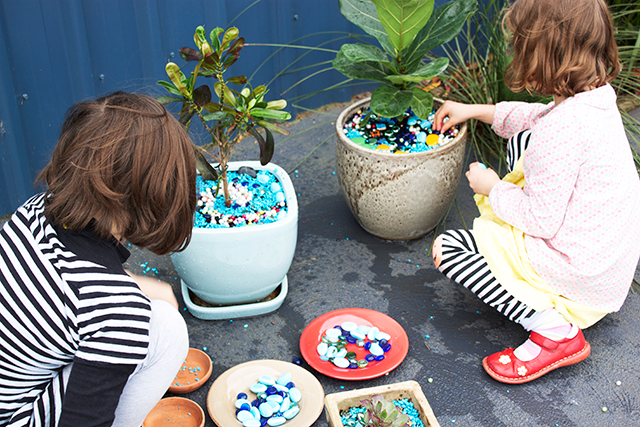

We now have some cute pots to place around the house. I'm sure they will get tampered with, but that's ok. I loved that the girls had a great time with it and it was more about the experience and process of creating. I might run out of a certain tile whilst mosaicking in the future, and have to  borrow some of these... shhhhh :)

Who loves pretty, shiny things!?


So, who says you need to use neutral mulches for your pots!? 

If you're into colour in your life this is a creative idea for adding some colour into your house in your indoor pots. Or outside pots. 

I love garden art.

I could totally see this used as a project for kinder kids making a gift for Mother's Day, using a small potted succulent with all the decorations that the kids could place in. Fun.

Jules :)

July 13, 2017

Children's Picture Book Review: Gaston

Time for a creative children's book review! I love beautifully illustrated children's books. I'm always drawn towards the illustrations in a book first, but then a creative interesting story is icing on the cake. I have always collected children's picture books, I did before I had kids, and I will continue to do so when they've grown up.

This post contains affiliate links. Read more at the bottom of this post.

Today I'm looking at the book Gaston by Kelly DiPucchio, illustrations by Christian Robinson.


This is a fun children's picture book with stylish illustrations that Miss 6 had me reading over and over. It's a clever book involving two families of dogs in France. I'm assuming France because there are names like "Antoinette" and language like "oui oui" in the book. And I'm pretty sure the dogs are french poodles and french bulldogs :)

Two puppies get switched at birth and are somewhat misfits within the other family; but that dynamic feels natural to them. It's a book about being different and fitting in anyway. The story could act as a discussion prompt with kids about being who you are: an individual, complete with all your quirks and flaws.

Seemingly simple graphic-style pictures, the expressions on the dogs portray their emotions well. The stylised shapes of the dogs really make me smile.


Christian Robinson's illustrations have me in awe and wonder. Some people are in awe at super realistic technical illustrations, but I am in awe when an illustrator can really pump a lot of style into the artwork, yet still portray all the emotion that's needed in the story. That's a real skill. The illustrations are just gorgeous.


The story is super cute, the illustrations are super cute. Adorable!

I had a poke around at Christian Robinson's website, which I enjoyed looking at, and can be found here: The Art of Fun

Gaston can be found here.

I would love to check out some other books illustrated by Christian Robinson. I think I'm a bit taken by his illustration style!


So cool. I think his illustrations have a vintage feel to them, but they also look modern at the same time.

I hope you enjoyed this book review! Happy reading...

Jules :)

*Affiliate Information: Affliliate links help me earn small commissions on products (at no extra cost to you), which helps support my love of blogging and sharing creative things. I only ever recommend or link to products that I'm genuinely into.

July 10, 2017

Free Sewing Room Print Download + Some Sewing Room Inspiration

Hello Creative Souls,

I recently made this sewing room wall art print as a Birthday gift for my Mum. I decided to make it available here on my creative blog as a free printable for you guys!


I printed out the image on my home inkjet printer on matte photo paper. I made a wooden panel for it to fit onto, but you could just as well frame it if you wanted, or get it printed onto a canvas.

I recently finished that unpcycled bunting there too- made from a thrifted scarf. And my Mum made that cotton holder for me :)

I would like to make a tutorial in the near future showing how I make my custom sized wooden panels. They are really quite easy and a cheap way to display a print without paying for custom framing. Old calendar images, postcards or gift cards would work with this method fantastically for some really cost effective art for your walls.

The colours look slightly different in the photos, blue always seems to be tricky to photograph for my camera

But back to the print. I found the image of the sewing lady from The Graphics Fairy and then placed her on a coloured background in photoshop, overlaying her on a scan of an old book cover which I recoloured, and added the text "may your bobbin always be full". 

To download the full printable sized file click here. 

(It's for personal use only; ie. for yourself or a gift, not to sell. Those typefaces I have used are not for commercial use.)

I cut some plywood the size of the print, then added some wooden sides to make a wood panel and a wire hanger. I glued the print on using mod podge (the panel was sealed first using gesso), then after the glue had dried I painted the sides with acrylic paint and then sealed the whole thing with acrylic gloss medium.


She looks nice in my sewing space! My sewing space used to be in my art studio but I was feeling too cramped in there so I moved it all into the guest room. 


I have an upcycled light in there too. I love making my own lights for my home. (This is light number 8 I have decorated and I have a big white one downstairs which has it's days numbered!)


I hope you like the print and at the very least I hope I have inspired you with my sewing space.

Jules :)

July 05, 2017

Wall Art Tips + A Temple & Webster Giveaway

Hello! I'm chatting home decorating on the blog again today; specifically wall art, plus I have a giveaway at the end of this post from Australian online homewares store Temple & Webster. Yay!

...and I cannot lie

I love art on my walls. Or just stuff, really. Stuff everywhere on my walls. Here, more is more. But I know people usually don't go as crazy as I do ;)

See what I mean? Crazy :)

I've been thinking lately about BIG ART on walls. It just makes such an impact and quickly completes a space. I've been trying to go larger with my paintings, which helps me loosen up a bit as it's just a whole new way of working. The detail is spread out and therefore you can see more brush strokes and paint marks. If you can get your hands on some big art, do it. Big art looks ace.

I really think wall art is just any type of decoration that can adorn your walls to make them more interesting. You can think outside the box and hang anything you like. Here are some ideas:

-Tickets or postcards taped with a bit of washi tape (we love washi tape here)
-A dress on a vintage coat hanger
-A plate collection
-Fancy tea towels
-An interesting hat
-An old paint palette
-A rug
-Patterned fabric stretched over canvasses
-Kids art
-Bunting

Click here for more ideas from Temple & Webster's wall art category.

Hang a plate collection up. Here we have a mix of a kids painted plate, a ceramic trivet, designer plates and cheaper target plates. Mix n match! (Or don't match, I think that's better)

I like shelves in all shapes and sizes that you attach directly to a wall to place lots of little decoratives or collections in. Clusters of similar objects work nicely. I'm a big fan of using kids art on my walls, they are the ultimate abstract artists! Don't forget wallpaper too as an awesome way to dress up your walls.

I don't think you need to spend lots of money decorating walls either. It's just a matter of thinking creatively about what you can do with what's affordable, or what you already have.


So anything that sparks your interest really can become wall art. I keep an open mind when browsing around shops or thrift stores, the purpose an item was originally made for doesn't mean it only has one destiny.

I scoured the Temple&Webster store and picked out a few finds that I would totally hang on my walls.

Aiyana feather dream catcher, camaroon headdress, casa uno leaf wall decor, ibiza costa hand- tufted multi rug. All from Temple & Webster. I saw a rug recently as a bed header in a home decorating book- such an awesome idea.


I'm loving these paintings I found there. The colours and all those spots of paint which add detail and contrast in shape to the looser brush strokes and shapes in the background. Yum. They make me want to start painting right now.

I think of my walls as big blank canvasses. And they're slowly being filled up. What will I do when they're all full!? Rearrange I guess :)

I love little shelves or shadow boxes filled with collections. My girls & I found this one at a local op shop and we covered the insides with scrap book paper and used a heap of buttons for the edges. (Now I have no small buttons in my collection..)

Bunting, kids art & crafts look great as wall decor

I have been asked how I hang everything. We own this house we live in and I'm not precious about the walls so bang, bang, bang.. in go the nails & hangers. But if you're renting or just not so brave I would have to recommend anything from the 3M range of removable hooks and tapes. They are not totally guaranteed not to remove any wall paint when you're done, but I've had great success with them whilst decorating my walls. (We keep our paint wall colours in jars for quick touch ups.)

I hope I've inspired you a bit when it comes to wall art & decorating your spaces.

Now for the giveaway!

Update: This competition has closed and winner has been announced

Temple & Webster are offering a $50 voucher to give to one of my readers. Just leave a comment on this post with what kind of wall art you love. In two weeks time I will draw a winner which will be on Wednesday 19th July 2017.

Please put your email address in with your comment so I can contact you if you win. Like this: jennywindow (at) fancymail (dot) com (to avoid spambots finding your email address).

Entry is open to residents within Australia.

Jules :)

July 02, 2017

Frosty Morning

Definitely still winter here. We woke to a decent frost this morning. Children tumbled out the door in less clothes than they should have been wearing, and I froze my little fingers walking around taking photos. We were excited to see that our pond had frozen over! Just a quick post today, now I'll leave you with some of the shots I took.


Jules :)

June 30, 2017

Creative Life Round Up

Here's a creative life round up, where I show a bunch of random shots from my crafty, arty & creative life.


Here I am testing out my new (but old) rug hooking tools. Which I guess are more like punch needles. They have quite a big opening in them so that I can use them with wool. I love the texture of hooked wool, and I love using wool with variations of colours within the ball.. it gives extra textural interest. And, this craft is fast! Which is great for an attention deficient crafter like me :) This effort is from one evening in front of the telly.


A bunting in progress upcycled from a thrifted wool scarf. I've also made some little upcycled tassels to use on this bunting too.


Hanging some of my collected lampshades up. I still have more to hang. I thought it might inspire my husband to get them hooked up electrically when they're all just hanging there from string and thumb tacks. Maybe!


Not being able to find an affordable jacket I like (in Australia) that is also warm I went and ordered a copy of Ottobre Magazine which has some jacket patterns in it. I'll get my Mum on the case when it arrives. She's an excellent sewer. I'm planning on getting her to make some lined jackets for me so that they will be nice and warm, plus how cute will patterned fabric for the lining be?


She also better get ready to sew some dresses for me. I have ordered this dress pattern designed by Dottie Angel. How awesome are they? Hoping to have some made up in time for spring when some warmer weather will be welcomed with open arms.


It's school holidays here now, and our first creative project saw us making some iced cookies. Check out how bad great they look! ;)

We eat more along the paleo/ healthy lines here, and I am yet to find an icing recipe that is easy to make AND use. I cannot master whipping coconut cream (I have ruined quite a few batches) and even this one I could not get to work. It was so clumpy to use but still tastes good I suppose. Looked nothing like it looked in the cookbook! This icing was made from cacao butter, coconut butter, honey and nut milk. 

The search continues! 

Other creative and crafty projects that we would like to do on the holidays include finishing some previously started projects and starting some plaster animals that will appear as a tutorial on my blog in the near future.


My final MATS illustration project has begun, which is a crazy eclectic mix of icons inspired by collections (I chose a quirky doll collection and beads). Right up my alley! I love that for the last project we get to go a little crazy. I will post the finished project here when done.


Miss 8 recently entered the Young Archie portrait prize. This is her mixed- media piece. I helped her with the planning but every step was completed entirely by her. I suggested a plan of attack: 

-draw your portrait in pencil on plain paper
-create some decorative papers to use for collage
-paint/ fill your background on your good paper (watercolour paper)
-glue your collage pieces onto the background
-transfer your portrait drawing onto the background using carbon transfer paper
-render the figure. She used acrylic paints and coloured pencils for the figure. 

The last step was to sign and varnish. 

The only thing I helped with was reassurance along the way, enlarging her drawing to transfer onto the watercolour paper, and some colour mixing tips when she got stuck. I believe having a plan & breaking it down into little steps removed some of the overwhelm of trying to create something good to enter into a competition. That kind of pressure is heavy!

That's it for now. 

If you've enjoyed these pics, I do the most sharing of my creative life in picture form on Instagram. Come join me there!

Yours creatively,

Jules :) 

LinkWithin

Related Posts Plugin for WordPress, Blogger...
01 09 10