February 22, 2018

Goodbye Archie Boy

Such a sad thing happened over the summer school holidays. Our pup that we recently got had some relapses with his autoimmune disease. He was going ok on his medication, but really was never the same dog since initially getting sick when he was just 17 weeks old. I've only just now got to the stage where I can share this here.

Archie-boy days before another relapse

I won't go into the sad details of what happened, all I will say is that when we weighed up everything, and thinking about what the future would hold for him, we decided to have him forever put to sleep, soon after some new medical issues presented themselves at the tender age of 6 months.

That day required some serious emotional eating by all involved in the form of various flavours of ice cream.

Archie in emergency when he first got sick

I painted this artwork to work through some emotions I was feeling surrounding the whole experience. The painting initially read "Will it be ok", and I painted over some of the words for it to read, "It will be ok." It's like I worked through some emotions from the beginning of the painting to the end. The painting is filled with texture and layers to symbolise the depth of our lives and emotions. The spikey bits represent those challenges we face every now and then. The painting is filled with shapes symbolic of happier, calmer times too.


When I was painting this I was asking the universe some pretty unanswerable questions, as we have had some grief surrounding us with close friends and losses and challenges they are going through at the moment.

I don't know what the answers are except that we just try to do our best, and get up each morning and put one foot in front of the other.

***

We thought Archie's last day was in this photo below when he had a particularly bad relapse, but we managed to get a bit more time with him. Since getting sick he always had gunky eyes, and his nose was always dry, yet dripping constantly and under his chin was always wet due to the medication making him so thirsty. I have no idea if he was in constant pain, but I suspect from his lack of activity, he wasn't doing too well.


I'm still trying to work through all this, and I get that he was "just a dog", but I really didn't cope well with it at all. In some ways, it was harder saying goodbye to him than my two previous older dogs, who I know had come to the end of their lives. I was left with no residual anger or guilt when their times were up; just the grief.

Archie really did tick all the boxes for us as a dog and we were over-the-moon happy with him. It took me a long time to bring another dog into our lives, out of fear of what we'd get, and I was so relieved when Archie came along. He was perfect. (Except for perhaps the leg humping, which he never did again after getting sick but we would have gladly welcomed back!)

Now, we are in the same boat again. We really do want to share our lives with a dog and have a pup grow up with our animal-loving kids. But I'm fearful of what we'll get! I just need to trust that the right dog will come to us eventually :)


Happier days - pre auto-immune disease

Our lives were enriched for a short time by having this precious boy with us. I feel bad for my girls who went through this journey alongside us, but I suppose there are some life lessons in there for them. 

I have made him a memorial stone and he has joined our previous dogs Bender and Leela in a section at the back of our garden. (This project can also be found as a free tutorial which you can find here: DIY pet memorial stone)


Goodbye Archie-boy. We loved you to the moon and back and we hope you're having a humping, I mean "twirking", good time in doggy heaven.

Jules.


February 16, 2018

Arty Nails: DIY Transfer

Hello creative souls :)

Some DIY nail art today!

I'm not a big fan of fancy glamorous nails, but colourful fun arty nails? Yes please. :)

I made a transfer using scrapbook paper, which is fun because the options are limitless when utilising this craft supply.


Start by applying two coats of clear nail polish to a small piece of the scrapbook paper, letting the nail polish dry in between coats.


Trim the transfer to the width of your nail, rounding it at one end and leaving it longer than your nail; that part gets trimmed back later. Soak it in water for a minute or so.


Ever so gently, the next step is to rub the paper away from the back so you are left with a thin transfer. be careful not to tear it, it's very delicate! Dab it dry with a tissue.


Paint a coat of clear polish onto your nail and press the transfer on whilst the nail polish is still wet, then leave it to dry.


Trim the transfer back, add a top coat to protect, and you're done!


Now enjoy your arty nails!

Jules :)

February 05, 2018

New Art Print: Just be You

I have a new art print available in the shop.


This painting was created as part of the MATS illustration course I did. You can read about the process and see progress shots here.

A bit of wall decor... Example of "Just be You" framed 8 x 8"

It's such a simple yet inspirational and empowering quote. So many of us need a reminder that we don't need to try to be something else than our own unique, quirky and weird selves.

Just be you! Because everyone else is taken... :)

So from one shy person who at times can be riddled with insecurities, I'm finding this artwork is just as good a reminder to myself. 

I really enjoy my own company but am still learning how to completely own myself and be ok with who I am out in the wide world. I'm getting there slowly, the more I age :) 

I hope you like it!

You can find two sizes of this print here in the shop.

Jules :)

February 04, 2018

Out & About: Sand Sculpting Frankston 2017

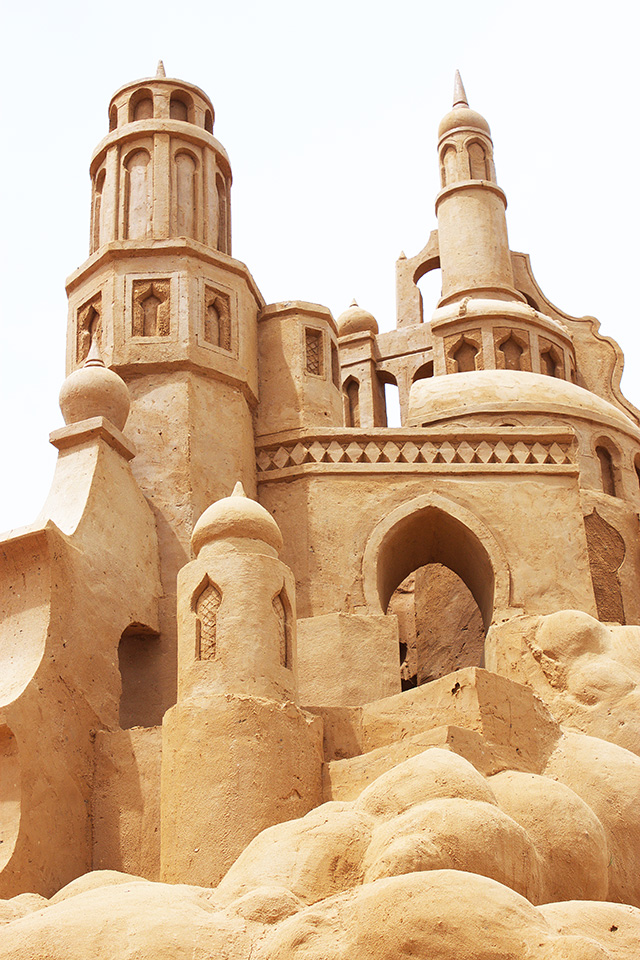
A few weeks ago we made our way out to see the latest Sand Sculpting Australia's event at Frankston, Victoria, this year's theme being Aladdin.


3500 tonnes of sand was sculpted into characters and scenes with mind-blowing detail. The work that's gone into each sculpture is amazing. I was interested to learn that there are no additives added to the sand, they use brickies sand which holds it's shape, and they start with big blocks which the sculptors carve into. It took 20 sculptors 5000 hours over 30 days to create them. They are then sprayed with a bio-degradable finish to help them last.


Some of the sculptures were a tiny bit weather damaged, but that did not impact the exhibition at all. In fact, I'm amazed that they stand up to the weather for so long.


We all had favourites. This bird was one of mine. I think it's the combination of textures and the organic shapes and chunkiness of it that I liked.


The centerpiece was this huge castle. It was huge and pretty fantastic. I think I took a few too many photos of it :)


This event certainly inspires the kids to get into a bit of sand castle building afterwards! We actually had a trailer load of sand at home for some work that Jim is doing, and so the kids got in there later on and started carving out the sand :) it always makes me happy seeing them inspired.

After the sand castles we went for a bit of a paddle at the nearby beach. (Well, the kids did. Too cold for me!)


You can check out more information about the Aladin sand castles at Sand Sculpting Australia. The exhibition runs until 25th April 2018.

Jules :)


LinkWithin

Related Posts Plugin for WordPress, Blogger...
01 09 10